


Eureka 概述
和 Consul、Zookeeper 类似,Eureka是一种基于REST(Representational State Transfer)的服务,最开始主要应用于亚马逊公司旗下的云计算服务平台AWS,用于定位服务,以实现中间层服务器的负载平衡和故障转移。Eureka分为Eureka Server和一个基于Java的客户端组件Eureka Client,它使与服务的交互变得更加容易。客户端还有一个内置的负载均衡器,可以进行基本的循环负载均衡。在 Netflix 中,一个更复杂的负载均衡器包含Eureka基于流量,资源使用,错误条件等多种因素提供加权负载平衡,以提供卓越的弹性。
## 起源Netflix 是一家互联网流媒体播放商,是美国视频巨头,随着Netflix转型为一家云计算公司,它也开始积极参与开源项目。
Eureka 是 Netflix OSS(Open Source)组件之一,是由Netflix公司主持开发的一套代码框架和库,目的是解决上了规模之后的分布式系统可能出现的一些有趣问题。其它还有负载均衡组件 Ribbon、熔断器组件 Hystrix、熔断器监控组件 Hystrix Dashboard 组件、熔断器聚合监控组件 Turbine 组件、以及网关 Zuul组件。
Eureka 的典故:阿基米德发现浮力时,非常开心,于是说:“Eureka!”意思是“
我找到了!”。Netflix 将它们的服务发现组件命名为 Eureka 实在是非常形象。
Eureka 原理剖析
Eureka 满足了
中间层负载平衡的需求
三层结构
1.第一层是用户界面层(客户端),提供用户与系统的友好访问;
2.第二层是应用服务层(中间层),专司业务逻辑的实现;
3.第三层是数据库服务层(数据源),负责数据信息的存储、访问及其优化。
典型情况下 Web 服务器位于中间层(Middle Tier),业务对象在此实例化。中间层是生成并操作接收信息的业务规则和函数的集合。它们通过业务规则(可以频繁更改)完成该任务,并由此被封装到在物理上与应用程序程序逻辑本身相独立的组件中。
由于业务逻辑被提取到应用服务层,大大降低了客户端负担,因此也成为瘦客户(Thin Client)结构,三层结构在传统的二层结构的基础上增加了应用服务层,将应用逻辑单独进行处理,从而使得用户界面与应用逻辑位于不同的平台上,两者之间的通信协议由系统自行定义。
通过这样的结构设计,使得应用逻辑被所有用户共享,这是两层结构应用软件与三层应用软件之间最大的区别。三层结构将表示部分和业务逻辑部分按照用户界面层和应用服务层相分离,用户界面层和应用服务层、应用服务层和数据库服务层之间的通讯、异构平台之间的数据交换等都可以通过中间件或者相关程序来实现。当数据库或者应用服务层的业务逻辑改变时,客户端并不需要改变,反之亦然,大大提高了系统模块的复用性,缩短开发周期,降低维护费用。
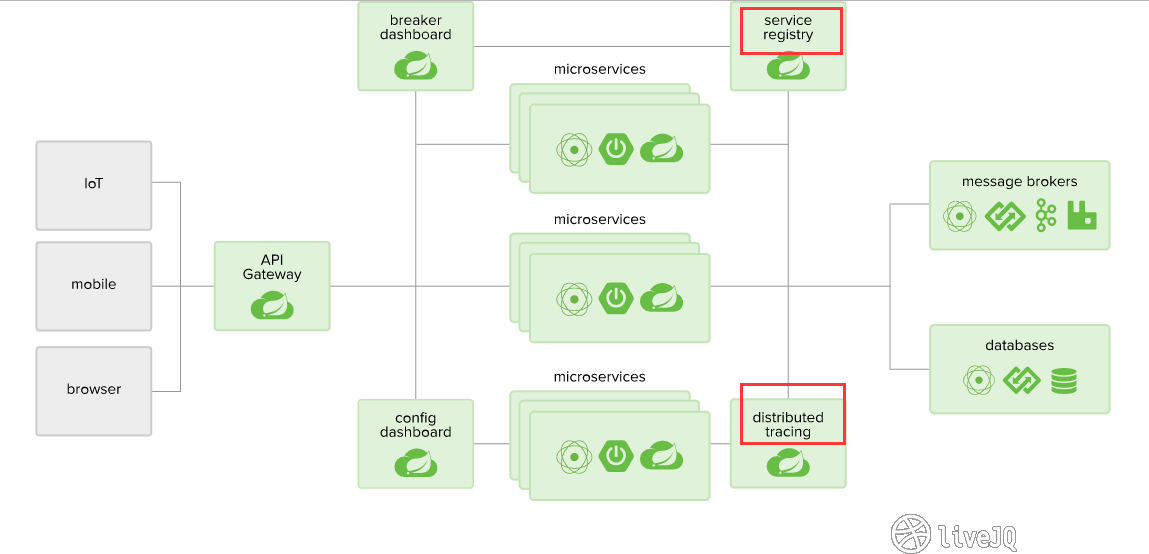
Eureka 整体架构

- Eureka Server:注册中心
- Application Service:服务提供者
- Application Client:服务消费者
- Application Service 在启动时,向 Eureka Server 注册自己提供的服务。
- Application Client 在启动时,向 Eureka Server 订阅自己所需的服务。
- Eureka Server 返回 Application Service 地址给 Application Client。
- Application Client 从 Application Service 地址中调用所需服务。
**Eureka Server:**提供服务注册服务,各个节点启动后,会在 Eureka Server中进行注册,包括主机与端口号、服务版本号、通讯协议等。这样 Eureka Server中的服务注册表中将会存储所有可用服务节点的信息,服务节点的信息可以在界面中直观的看到。Eureka Server支持集群模式部署,首尾相连形成一个闭环即可,集群中的的不同服务注册中心通过异步模式互相复制(DS Replicas)各自的状态,这也意味着在给定的时间点每个实例关于所有服务的状态可能存在不一致的现象。
**Eureka Client:**主要处理服务的注册和发现。Eureka Client 通过注册和参数配置的方式,嵌入在客户端应用程序的代码中。在应用程序启动时,Eureka Client 向服务注册中心注册自身提供的服务,并周期性的发送心跳来更新它的服务租约,默认周期为30秒,如果 Eureka Server 在多个心跳周期内没有接收到某个节点的心跳,Eureka Server将会从服务注册表中把这个服务节点移除(默认90秒)。同时,它也能从 Eureka Server 查询当前注册的服务信息并把它们缓存到本地并周期行的刷新服务状态。
消费服务:服务消费者在获取服务清单后,通过服务名(application name)可以获取具体提供服务的实例名和该实例的元数据信息。因为有这些服务实例的详细信息,所以客户端可以根据自己的需要决定具体调用哪个实例,在 Ribbon 中会默认采用轮询的方式进行调用,从而实现客户端的负载均衡。
Eureka的弹性
弹性内置于客户端和服务器中
- Eureka客户端旨在处理一台或多台Eureka服务器的故障。由于Eureka客户端中包含注册表缓存信息,因此即使所有Eureka服务器都出现故障,它们也可以运行良好。
- Eureka服务器可以抵御其他同类产品。即使在客户端和服务器之间的网络分区期间,服务器也具有内置的弹性以防止大规模中断。
Eureka 与 AWS ELB 有何不同?
AWS Elastic Load Balancer 是面向最终用户 Web 流量的边缘服务的负载平衡解决方案。Eureka 满足了 中间层负载平衡 的需求。虽然理论上您可以将您的中间层服务置于 AWS ELB 之后,但在 EC2 classic 中,您会将它们暴露给外部世界,从而失去 AWS 安全组的所有实用性。AWS ELB 也是传统的基于代理的负载平衡解决方案,而使用 Eureka 则不同之处在于负载平衡发生在 实例/服务器/主机 级别。客户端实例知道他们需要与哪些服务器通信的所有信息。
在 Netflix 中,我们更喜欢我们的服务是无状态(非粘性)。这有助于实现更好的可扩展性模型,Eureka 非常适合解决这个问题。您的应用程序可以适应负载均衡器的中断,因为有关可用服务器的信息会缓存在客户端上。这确实需要少量内存,但可以获得更好的弹性。
在AWS云中,由于其固有的特性,服务器来来去去。与使用具有众所周知的IP地址和主机名的服务器的传统负载均衡器不同,在AWS中,负载均衡在使用负载均衡器注册和取消注册服务器时需要更加复杂。由于AWS尚未提供中间层负载均衡器,因此Eureka填补了中间层负载均衡领域的巨大空白。
应用程序客户端和应用程序服务器如何通信
Eureka 可帮助您查找有关您希望与之通信的服务的信息,但不会对协议或通信方法施加任何限制。例如,您可以使用 Eureka 获取目标服务器地址并使用诸如 thrift,http(s)或任何其他 RPC 机制之类的协议。默认情况下,EurekaClient 使用 Jersey 进行 HTTP 通信。
Eureka 做为组件的集成使用
Spring Cloud 包含了非常多的子框架,其中 Spring Cloud Netflix 就是其中一套框架。其使用经过实战考验的 Netflix OSS 组件构建大型分布式系统。它是 Spring Cloud 架构微服务的核心组件,也是基础组件。
目前使用的都是 Eureka 1.x,关于Eureka 2.x 的现有开源工作已经停止。
Eureka 在 Spring Cloud 中的位置
spring cloud 整体架构
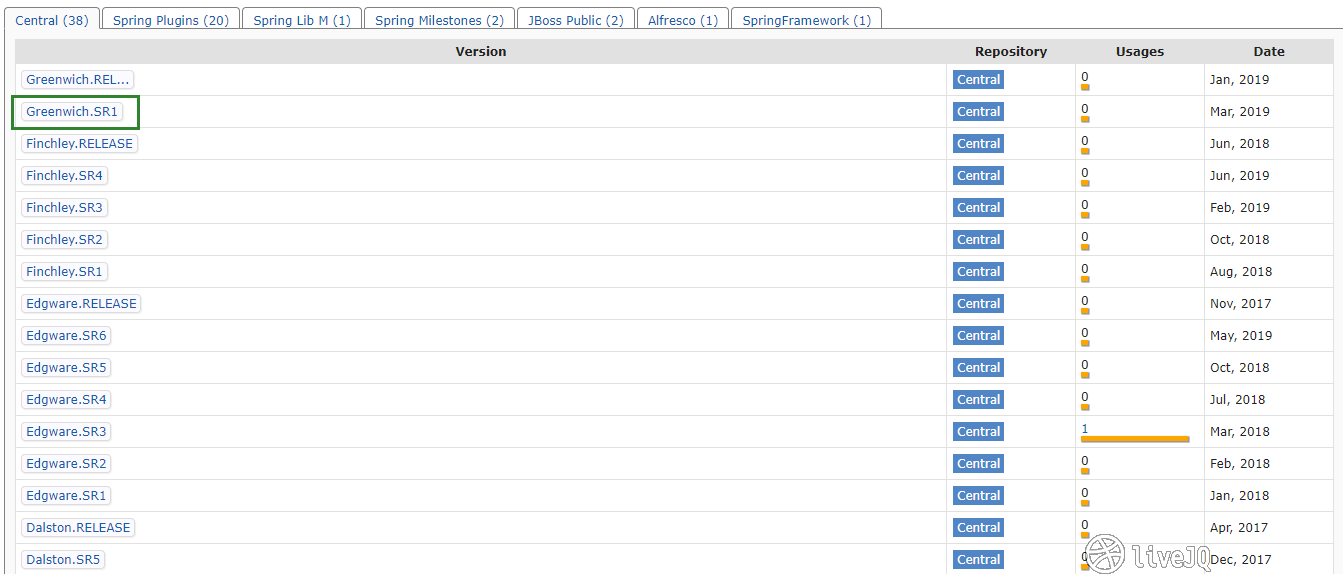
本实验使用的 Spring Cloud 版本为 Greenwich.SR1,
其声明在 spring-cloud-dependencies 中。
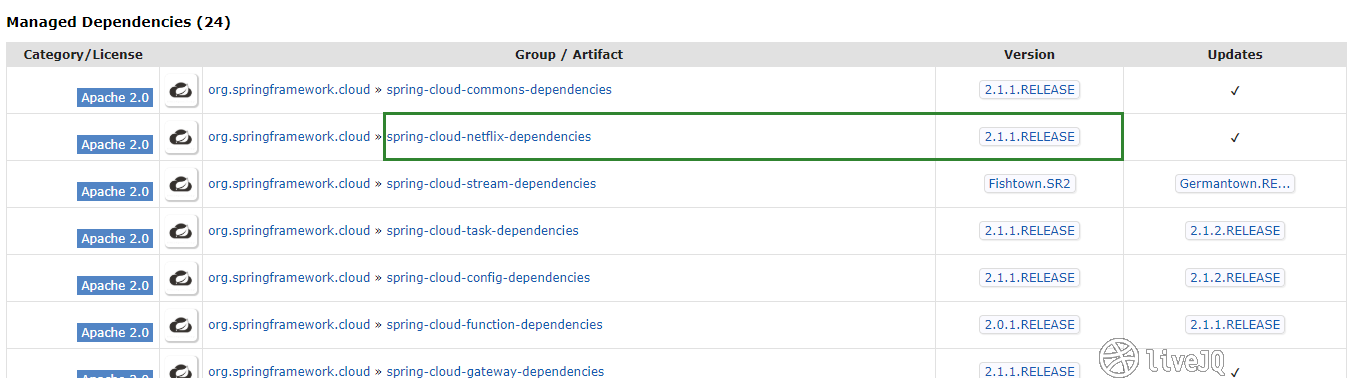
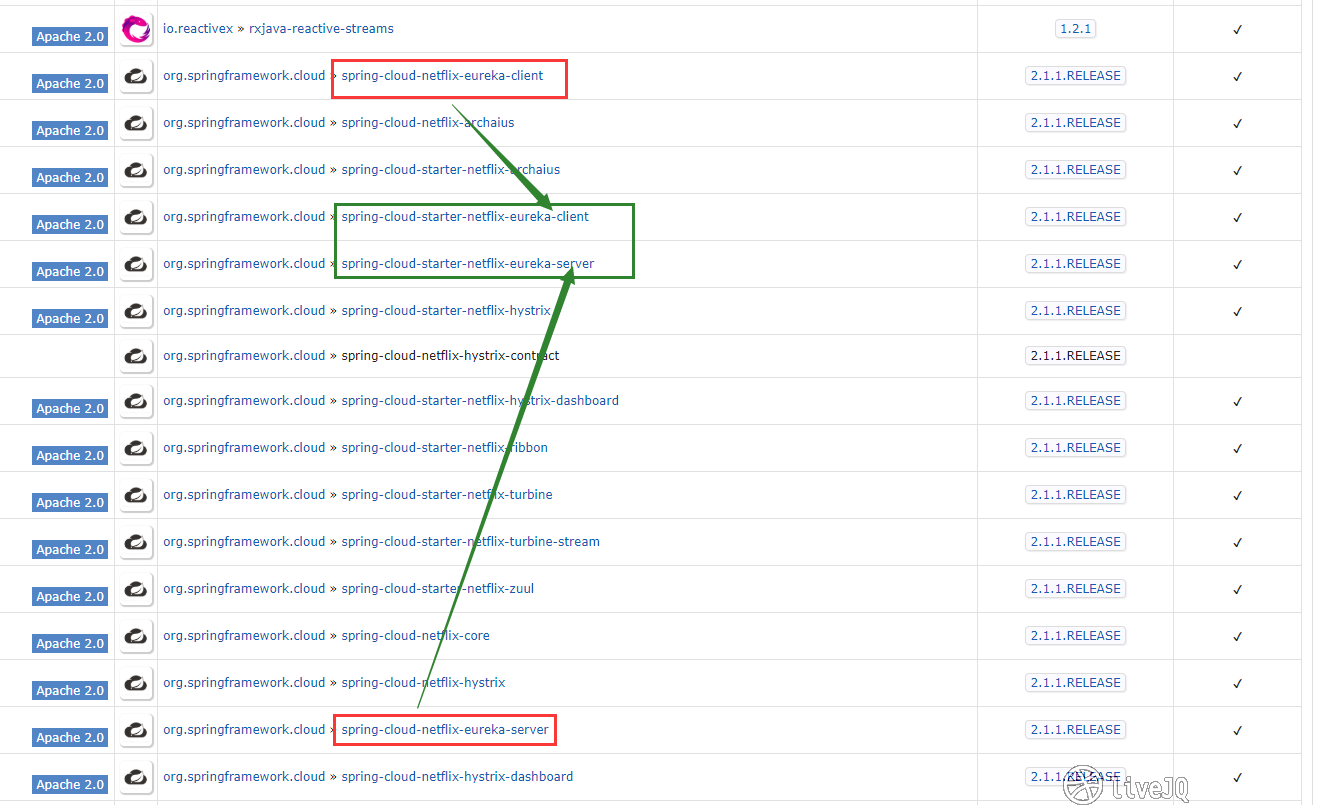
spring-cloud-starter-netflix-eureka-server 和其 client 是对 spring-cloud-netflix-eureka-server 和 client 的整合,根据依赖关系自动引入。
大体位置如下:
- Greenwich.SR1
- ...等共 24 个管理的依赖
- spring-cloud-netflix-dependencies
- ...等共 49 个管理的依赖
- spring-cloud-starter-netflix-eureka-server
- spring-cloud-starter-netflix-eureka-client
spring-cloud-starter-netflix-eureka-server 编译所需的依赖:
Compile Dependencies (5):
| Category/License | Group/Artifact | Version | Updates |
|---|---|---|---|
| Apache 2.0 | com.netflix.ribbon » ribbon-eureka | 2.3.0 | 2.7.17 |
| Apache 2.0 | org.springframework.cloud » spring-cloud-starter | ||
| Apache 2.0 | org.springframework.cloud » spring-cloud-netflix-eureka-server | 2.1.1.RELEASE | ✔ |
| Apache 2.0 | org.springframework.cloud » spring-cloud-starter-netflix-archaius | 2.1.1.RELEASE | ✔ |
| Apache 2.0 | org.springframework.cloud » spring-cloud-starter-netflix-ribbon | 2.1.1.RELEASE | ✔ |
spring-cloud-starter-netflix-eureka-client 编译所需的依赖:
Compile Dependencies (9):*
| Category/License | Group/Artifact | Version | Updates |
|---|---|---|---|
| Dist Coordination Apache 2.0 | com.netflix.eureka » eureka-client | 1.9.8 | 1.9.12 |
| Dist Coordination Apache 2.0 | com.netflix.eureka » eureka-core | 1.9.8 | 1.9.12 |
| Apache 2.0 XML Processing | com.netflix.ribbon » ribbon-eureka | 2.3.0 | 2.7.17 |
| BSD | com.thoughtworks.xstream » xstream | 1.4.10 | 1.4.11.1 |
| Apache 2.0 | org.springframework.cloud » spring-cloud-starter | ||
| Apache 2.0 | org.springframework.cloud » spring-cloud-netflix-hystrix | 2.1.1.RELEASE | ✔ |
| Apache 2.0 | org.springframework.cloud » spring-cloud-netflix-eureka-client | 2.1.1.RELEASE | ✔ |
| Apache 2.0 | org.springframework.cloud » spring-cloud-starter-netflix-archaius | 2.1.1.RELEASE | ✔ |
| Apache 2.0 | org.springframework.cloud » spring-cloud-starter-netflix-ribbon | 2.1.1.RELEASE | ✔ |
实现基本的服务注册与发现
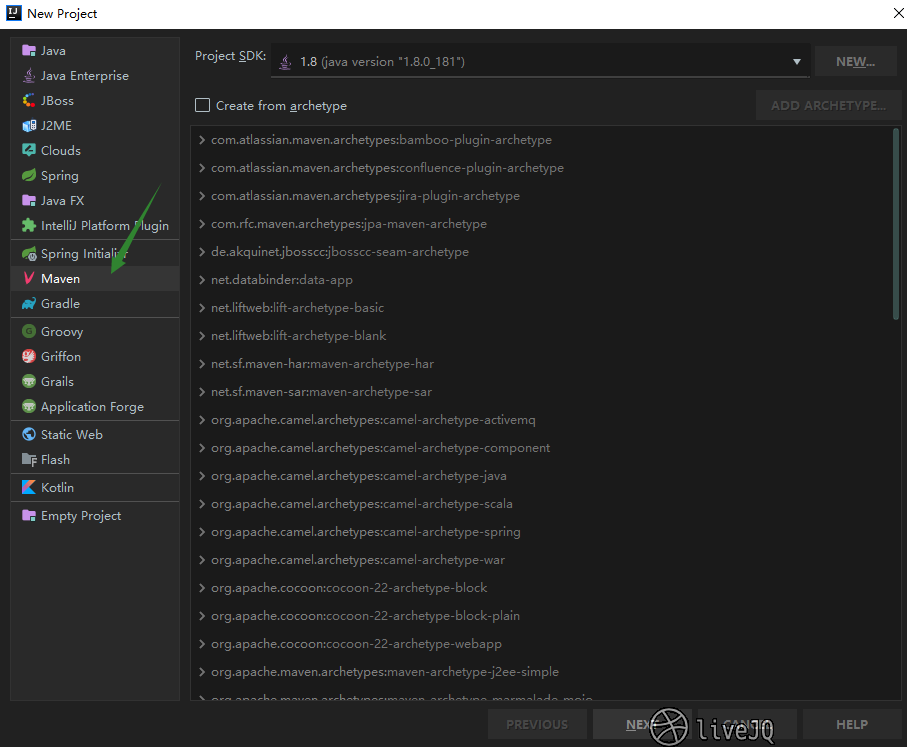
为了方便后续的测试,首先新建一个 Maven 工程项目,之后可以在里面逐个建立相应的 Module 模块 来进行本实验。其中,为了避免冗余的配置信息,每个 Module 的项目管理文件 pom 都继承自这个 Maven 工程。
基本目录结构如下:
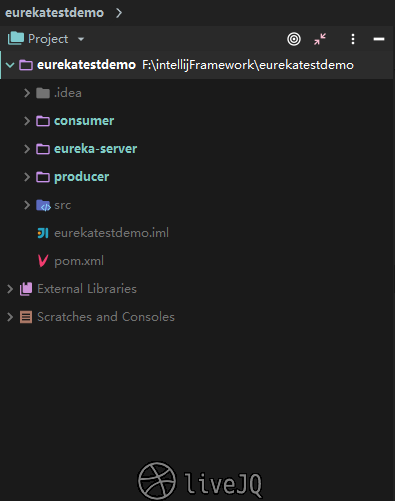
- pom.xml配置文件为:
<modelVersion>4.0.0</modelVersion>

    <groupId>com.livejq</groupId>
    <artifactId>eureka-test-demo</artifactId>
    <version>1.0-SNAPSHOT</version>
    <packaging>pom</packaging>

    <parent>
        <groupId>org.springframework.boot</groupId>
        <artifactId>spring-boot-starter-parent</artifactId>
        <version>2.1.5.RELEASE</version>
        <relativePath/> <!-- lookup parent from repository -->
    </parent>

    <properties>
        <project.build.sourceEncoding>UTF-8</project.build.sourceEncoding>
        <project.reporting.outputEncoding>UTF-8</project.reporting.outputEncoding>
        <java.version>1.8</java.version>
        <spring-cloud.version>Greenwich.SR1</spring-cloud.version>
    </properties>

    <dependencyManagement>
        <dependencies>
            <dependency>
                <groupId>org.springframework.cloud</groupId>
                <artifactId>spring-cloud-dependencies</artifactId>
                <version>${spring-cloud.version}</version>
                <type>pom</type>
                <scope>import</scope>
            </dependency>
        </dependencies>
    </dependencyManagement>
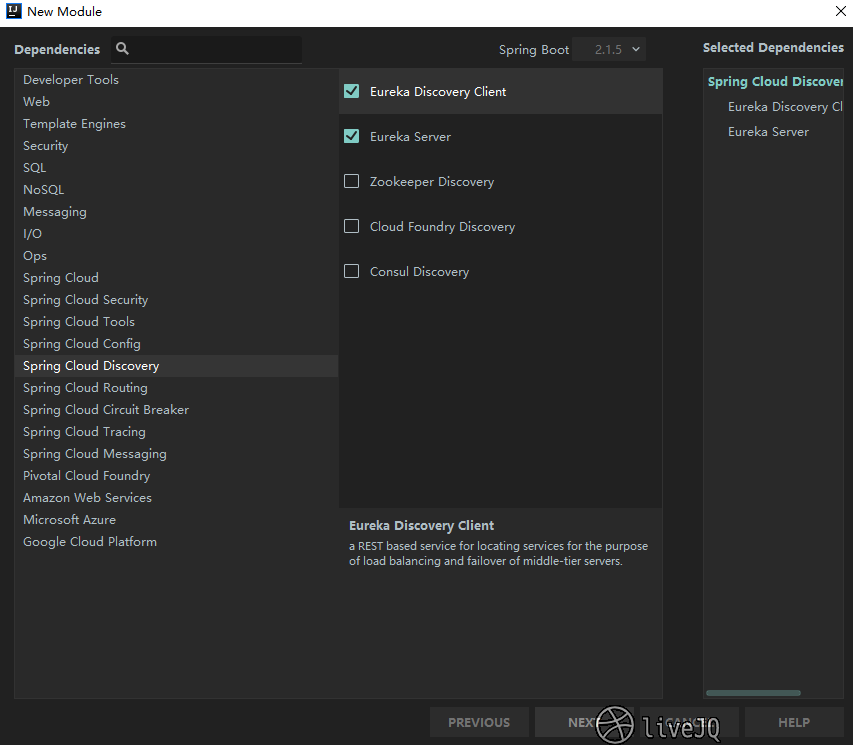
构建服务注册中心 eureka server
在 Maven 项目下新建一个 Module:
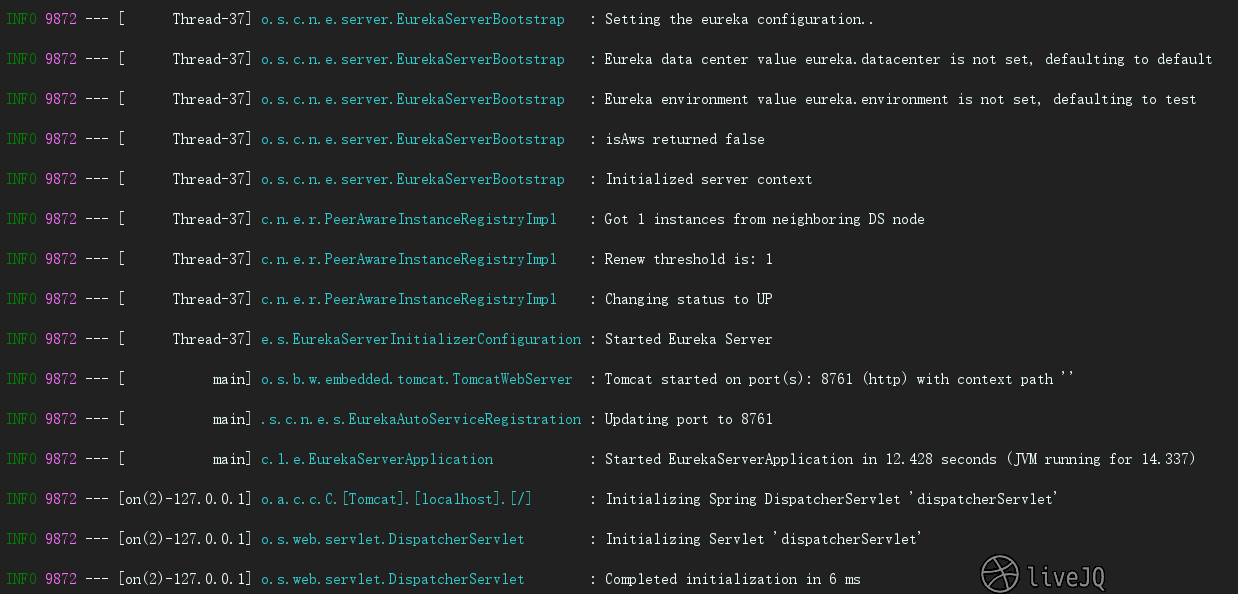
在主程序的上方写下关键的注解 @EnableEurekaServer 表明是一个 服务注册中心
package com.livejq.eurekaserver;

import org.springframework.boot.SpringApplication;
import org.springframework.boot.autoconfigure.SpringBootApplication;
import org.springframework.cloud.netflix.eureka.server.EnableEurekaServer;

@EnableEurekaServer // 声明为服务注册中心
@SpringBootApplication
public class EurekaServerApplication {

    public static void main(String[] args) {
        SpringApplication.run(EurekaServerApplication.class, args);
    }

}
- 编辑 resources 文件夹中的
application.yml:
server:
port: 8761
eureka:
instance:
hostname: localhost
lease-expiration-duration-in-seconds: 20 # 发呆时间,即服务续约到期时间(缺省为90s)
client:
register-with-eureka: false
fetch-registry: false
service-url:
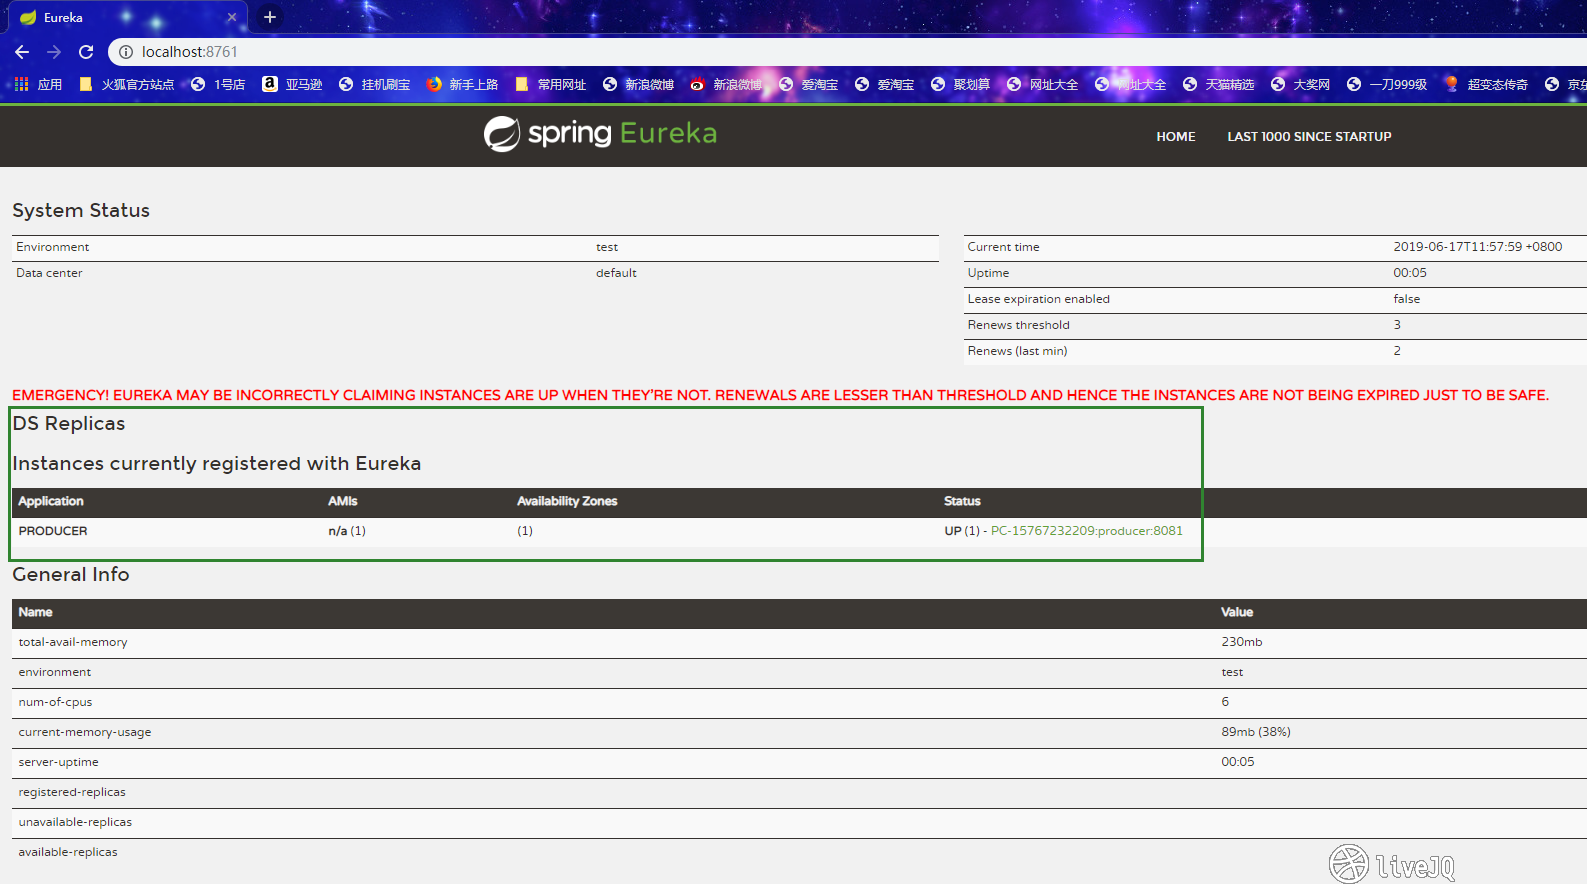
defaultZone: http://${eureka.client.service-url.defaultZone}:${server.port}/eureka/ # 独立模式(页面中会出现红色警告)
由于我构建的是 Eureka Server,它本身就是提供注册服务的,不必在其他注册表中注册自己,所以将 register-with-eureka 和 fetch-registry 设置为 false。
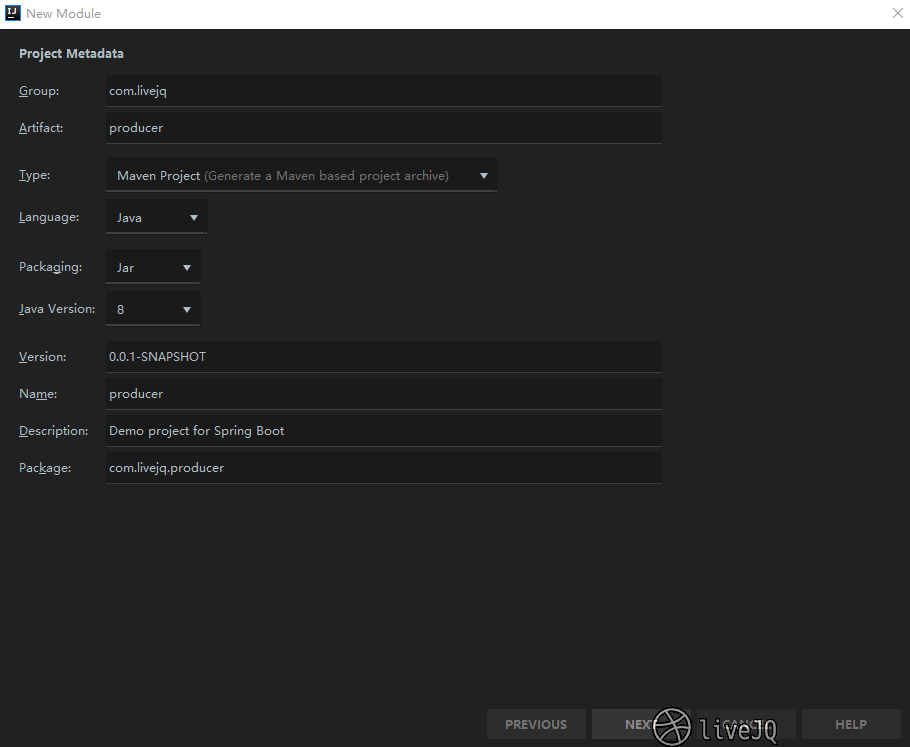
服务提供者 producer

- 生成的 pom.xml 文件为:
<modelVersion>4.0.0</modelVersion>

    <artifactId>producer</artifactId>
    <version>0.0.1-SNAPSHOT</version>
    <name>producer</name>
    <packaging>jar</packaging>
    <description>服务提供者</description>

    <parent>
        <groupId>com.livejq</groupId>
        <artifactId>eureka-test-demo</artifactId>
        <version>1.0-SNAPSHOT</version>
        <relativePath/> <!-- lookup parent from repository -->
    </parent>

    <dependencies>
        <dependency>
            <groupId>org.springframework.cloud</groupId>
            <artifactId>spring-cloud-starter-netflix-eureka-client</artifactId>
        </dependency>

        <dependency>
            <groupId>org.springframework.boot</groupId>
            <artifactId>spring-boot-starter-web</artifactId>
        </dependency>

        <dependency>
            <groupId>org.springframework.boot</groupId>
            <artifactId>spring-boot-starter-test</artifactId>
            <scope>test</scope>
        </dependency>
    </dependencies>

    <build>
        <plugins>
            <plugin>
                <groupId>org.springframework.boot</groupId>
                <artifactId>spring-boot-maven-plugin</artifactId>
            </plugin>
        </plugins>
    </build>
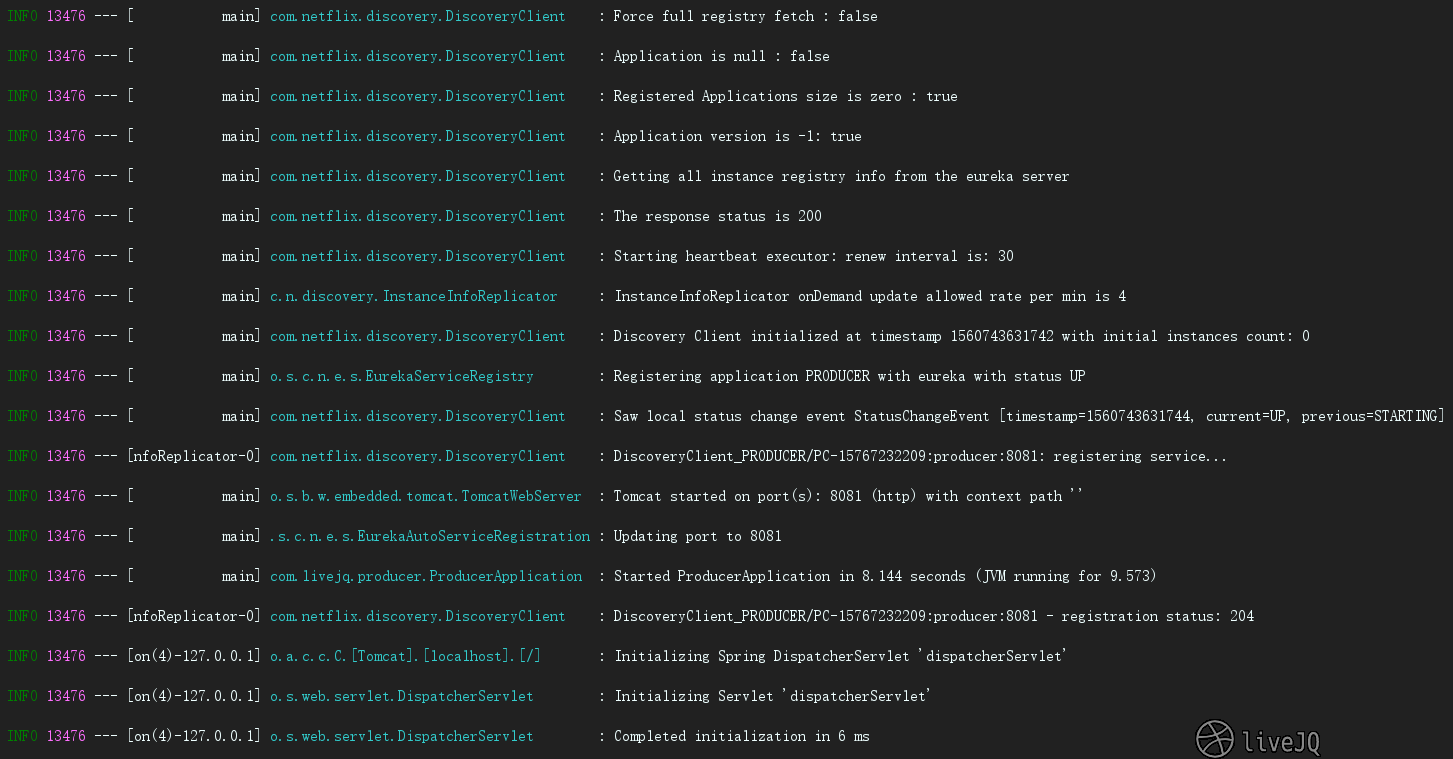
- 主程序 ProducerApplication:
package com.livejq.producer;

import org.springframework.boot.SpringApplication;
import org.springframework.boot.autoconfigure.SpringBootApplication;
import org.springframework.cloud.netflix.eureka.EnableEurekaClient;

/**
 * 描述: 生产者
 * Created by livejq
 * 2019-06-17 11:05
 **/
@EnableEurekaClient
@SpringBootApplication
public class ProducerApplication {

    public static void main(String[] args) {
        SpringApplication.run(ProducerApplication.class, args);
    }
}
注意:@EnableEurekaClient 上有 @EnableDiscoveryClient 注解,可以说基本就是 @EnableEurekaClient 有 @EnableDiscoveryClient 的功能。二者的功能差不多,但是使用的场景有区别。
在注册中心为 Eureka 时,可以使用 @EnableEurekaClient 也可以使用 @EnableDiscoveryClient
注册中心为不为 Eureka 时,比如 consul、zookeeper 等,只能使用 @EnableDiscoveryClient
可见 @EnableEurekaClient 的使用场景有局限性
- 控制类 ServiceInstanceRestController:
package com.livejq.producer;
import org.springframework.beans.factory.annotation.Autowired;
import org.springframework.beans.factory.annotation.Value;
import org.springframework.cloud.client.ServiceInstance;
import org.springframework.cloud.client.discovery.DiscoveryClient;
import org.springframework.web.bind.annotation.*;
import java.util.List;
/**
* 描述: 处理相关的请求
* Created by livejq
* 2019-06-17 20:23
**/
@RestController
public class ServiceInstanceRestController {
// 注入依赖
@Autowired
private DiscoveryClient discoveryClient;
@Value("${server.port}")
private String port;
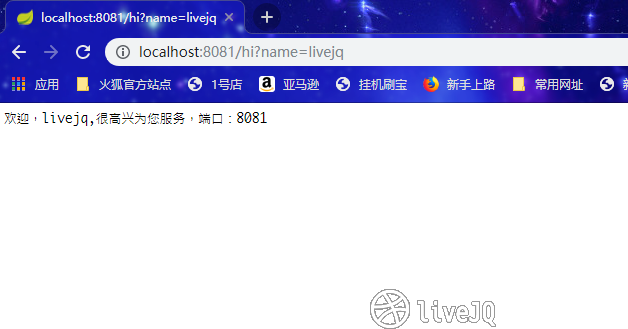
@GetMapping("/hi")
public String home(@RequestParam String name) {
return "欢迎," + name + ",很高兴为您服务,端口:" + port;
}
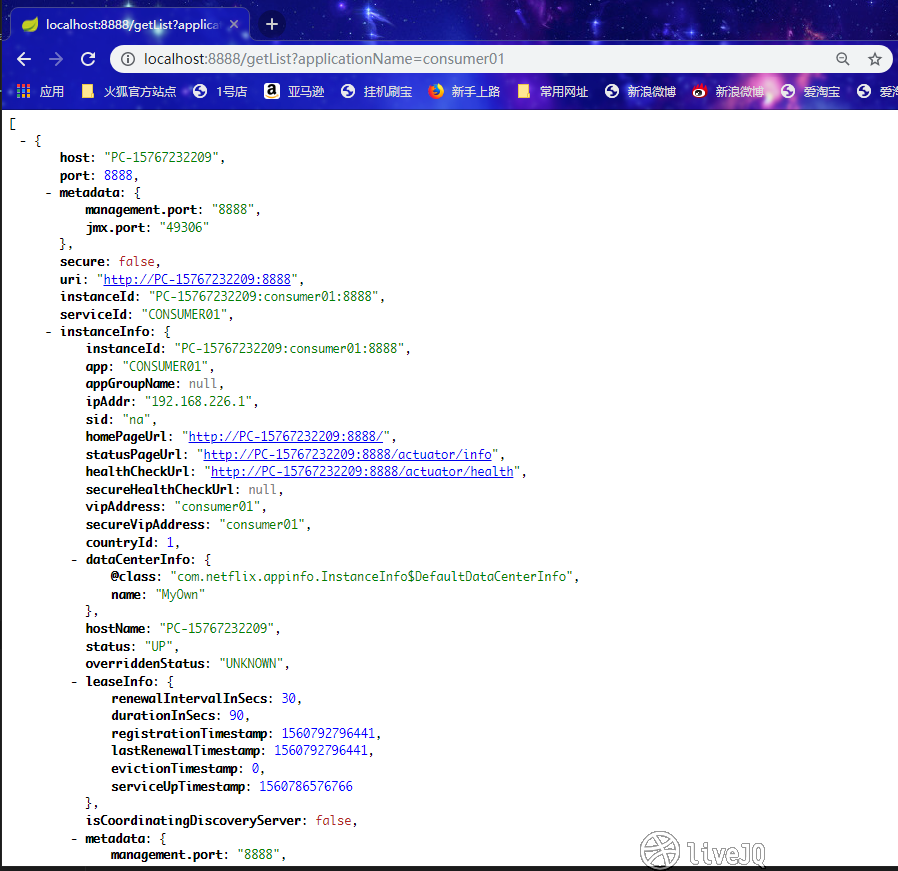
/**
* 通过 discoveryClient 服务发现接口,通过传入服务ID,获取任意已注册的client实例的相关信息
* @param applicationName
* @return
*/
@RequestMapping("/service-instances/{applicationName}")
public List<ServiceInstance> serviceInstancesByApplicationName(
@PathVariable String applicationName) {
return this.discoveryClient.getInstances(applicationName);
}
}
- 同样编辑该 resources 文件夹中的application.yml:
server:
  port: 8081  # 服务端口号

eureka:
  instance:
      lease-renewal-interval-in-seconds: 10 # client 隔多久去拉取服务注册信息,默认为30秒
      prefer-ip-address: true # 客户端在注册时就会使用自己的ip地址而不是主机名
  client:
    serviceUrl: # 注册中心的注册地址
      defaultZone: http://localhost:8761/eureka/

# 生产者服务名
spring:
  application:
    name: producer  # 调用的时候根据名称来调用该服务的方法
- 效果:
服务消费者 consumer
消费者与生产者的构建基本相同,就是 application 中所做的事情相反而已,一个生产,一个消费。
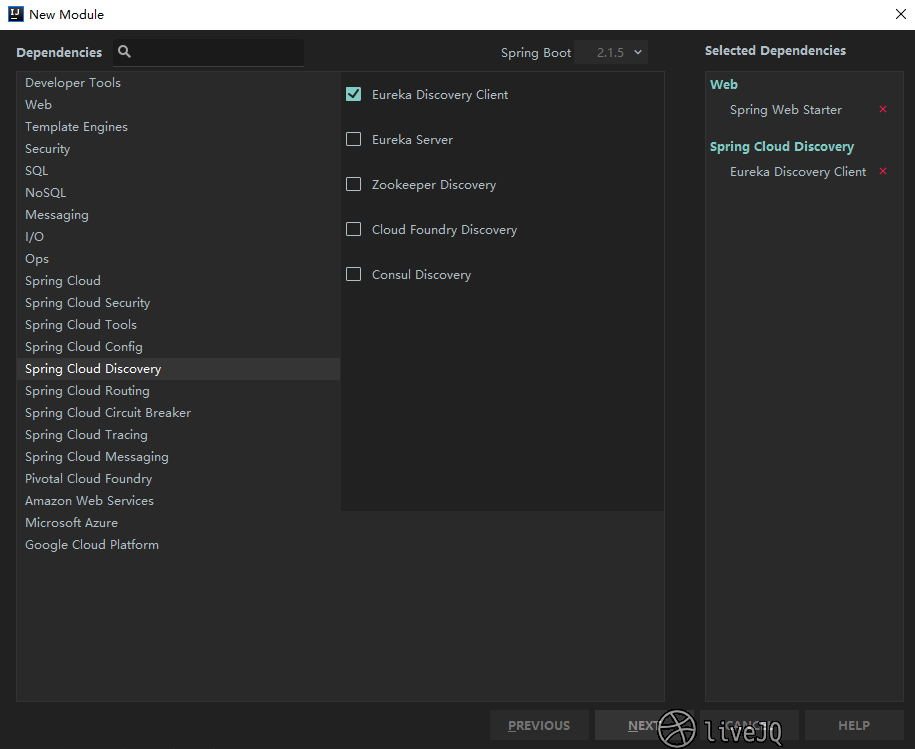
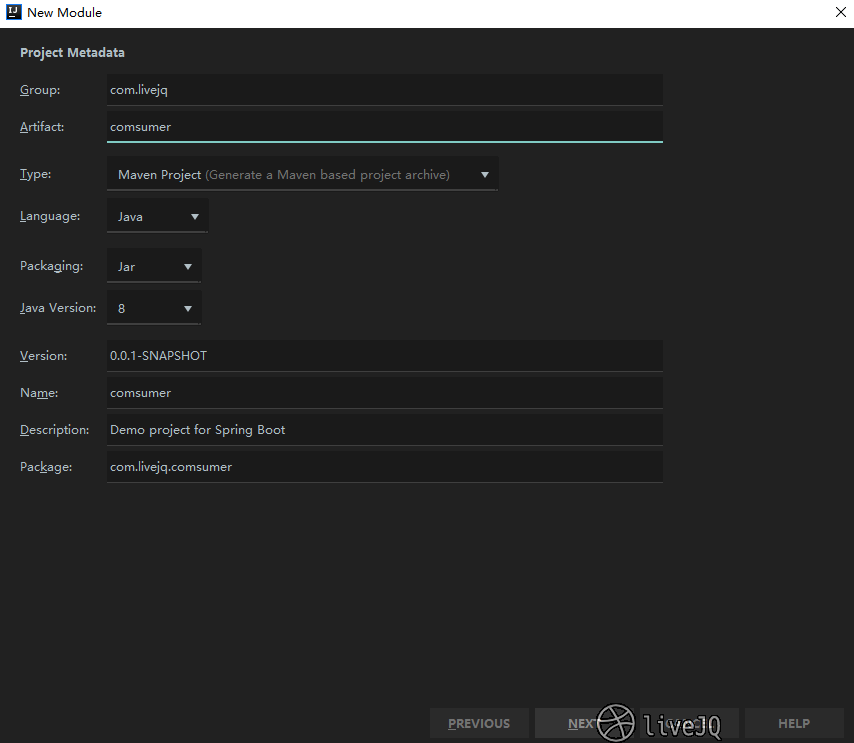
- 生成的 pom.xml 文件为:
<modelVersion>4.0.0</modelVersion>

    <artifactId>consumer</artifactId>
    <version>0.0.1-SNAPSHOT</version>
    <name>consumer</name>
    <packaging>jar</packaging>
    <description>服务消费者</description>

    <parent>
        <groupId>com.livejq</groupId>
        <artifactId>eureka-test-demo</artifactId>
        <version>1.0-SNAPSHOT</version>
        <relativePath/> <!-- lookup parent from repository -->
    </parent>

    <properties>
        <java.version>1.8</java.version>
        <spring-cloud.version>Greenwich.SR1</spring-cloud.version>
    </properties>

    <dependencies>
        <dependency>
            <groupId>org.springframework.boot</groupId>
            <artifactId>spring-boot-starter-web</artifactId>
        </dependency>
        <dependency>
            <groupId>org.springframework.cloud</groupId>
            <artifactId>spring-cloud-starter-netflix-eureka-client</artifactId>
        </dependency>

        <dependency>
            <groupId>org.springframework.boot</groupId>
            <artifactId>spring-boot-starter-test</artifactId>
            <scope>test</scope>
        </dependency>
    </dependencies>

    <build>
        <plugins>
            <plugin>
                <groupId>org.springframework.boot</groupId>
                <artifactId>spring-boot-maven-plugin</artifactId>
            </plugin>
        </plugins>
    </build>
由于使用了 @EnableEurekaClient,并在 application 文件中声明了注册中心地址,所以可以直接在主程序 ConsumerApplication 中通过服务名来调用服务:
package com.livejq.consumer;
import org.springframework.beans.factory.annotation.Autowired;
import org.springframework.boot.SpringApplication;
import org.springframework.boot.autoconfigure.SpringBootApplication;
import org.springframework.cloud.client.loadbalancer.LoadBalanced;
import org.springframework.cloud.netflix.eureka.EnableEurekaClient;
import org.springframework.context.annotation.Bean;
import org.springframework.web.bind.annotation.*;
import org.springframework.web.client.RestTemplate;
@RestController
@EnableEurekaClient
@SpringBootApplication
public class ConsumerApplication {
@Autowired
RestTemplate restTemplate;
public static void main(String[] args) {
SpringApplication.run(ConsumerApplication.class, args);
}
/**
* 实例化RestTemplate
* @return
*/
@LoadBalanced
@Bean
public RestTemplate rest() {
return new RestTemplate();
}
/**
* Rest服务端使用RestTemplate发起http请求,然后得到数据返回给前端
* @param name
* @return
*/
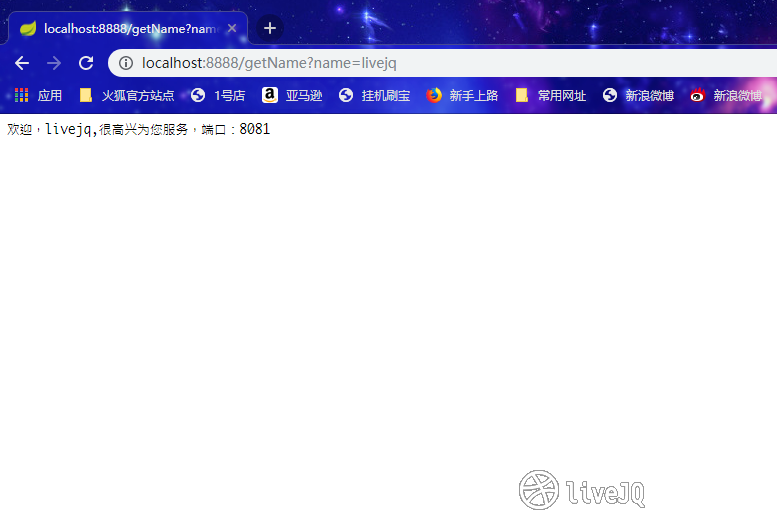
@GetMapping(value = "/getName")
@ResponseBody
public String getMessage(@RequestParam String name){
// 在注册中心注册了服务后,可直接以服务名访问所需的服务
String data = restTemplate.getForObject("http://producer01/hi?name=" + name, String.class);
return data;
}
}
- 编辑该 resources 文件夹中的application.yml:
server:
  port: 8888

eureka:
  client:
    registry-fetch-interval-seconds: 8 # 心跳时间,即服务续约间隔时间(缺省为30s)
    serviceUrl:
      defaultZone: http://localhost:8763/eureka/

# 消费者服务名
spring:
  application:
    name: consumer01
- 效果:
搭建 Netflix Eureka Server 高可用集群
Eureka Server 高可用设计
-
Eureka Server 在设计的时候就考虑了
高可用设计 ,链接。在 Eureka 服务治理设计中,所有节点既是服务的提供方,也是服务的消费方,服务注册中心也不例外。 -
Eureka Server 的高可用实际上就是将自己做为服务向其他服务注册中心注册自己,这样就可以形成一组互相注册的服务注册中心,以实现服务清单的互相同步,达到高可用的效果。
-
Eureka Server 的同步遵循着一个非常简单的原则:只要有一条边将节点连接,就可以进行信息传播与同步。可以采用两两注册的方式实现集群中节点完全对等的效果,实现最高可用性集群,任何一台注册中心故障都不会影响服务的注册与发现。
Eureka 服务器没有后端存储,但注册表中的服务实例都必须发送 心跳 以使其注册保持最新(因此可以在内存中完成)。客户端还有一个 Eureka 注册的内存缓存(因此,他们不必为服务的每个请求转到注册表)。
默认情况下,每个 Eureka 服务器也是 Eureka 客户端,并且需要(至少一个)服务 URL 来定位对等体。如果您不提供该服务,该服务将运行并正常运行,但它会在您的日志中填充很多关于无法向对等方注册的噪音。(如上文中所出现的当启动 Eureka Server 后,发现有一串显眼的红色字体)
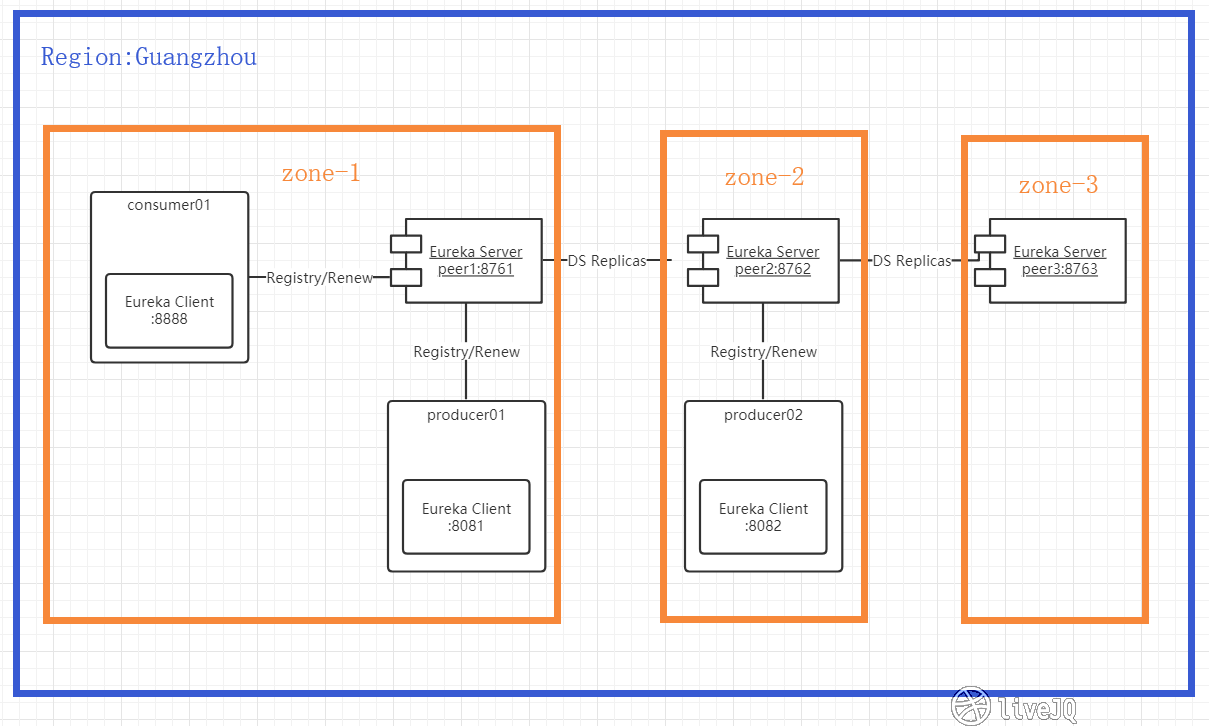
高可用性 region 和 zone
用户量比较大或者用户地理位置分布范围很广的项目,一般都会有多个机房。这个时候如果上线springCloud服务的话,我们希望一个机房内的服务优先调用同一个机房内的服务,当同一个机房的服务不可用的时候,再去调用其它机房的服务,以达到
减少延时的作用。
eureka提供了 region 和zone 两个概念来进行分区,这两个概念均来自于亚马逊的AWS:
(1)region:可以简单理解为 地理上的分区,比如亚洲地区,或者华北地区,再或者北京等等,没有具体大小的限制。根据项目具体的情况,可以自行合理划分 region。
(2)zone:可以简单理解为 region 内的具体 机房,比如说 region 划分为北京,然后北京有两个机房,就可以在此 region 之下划分出 zone1,zone2 两个 zone。
(3)服务注册:要保证服务注册到同一个zone内的注册中心,因为如果注册到别zone的注册中心的话,网络延时比较大,心跳检测很可能出问题。
(4)服务调用:要保证优先调用同一个 zone 内的服务,只有在同一个 zone 内的服务不可用时,才去调用别zone的服务。因此,为了保证服务注册到同一个zone的注册中心,一定要注意 availability-zones 的顺序,必须把同一 zone 写在前面
服务消费者和服务提供者分别属于哪个 zone,均是通过
eureka.instance.metadata-map.zone来判定的。服务消费者会先通过 ribbon 去注册中心拉取一份服务提供者的列表,然后通过 eureka.instance.metadata-map.zone指定的 zone 进行过滤,过滤之后如果同一个 zone 内的服务提供者有多个实例,则会轮流调用。只有在同一个zone内的所有服务提供者都不可用时,才会调用其它 zone 内的服务提供者。
设置 application.yml 配置信息
先在本机 host 文件中添加
127.0.0.1 peer1
127.0.0.1 peer2
127.0.0.1 peer3
- eureka-server
# 可根据profiles值声明使用指定的配置文件
spring:
  profiles: peer1
server:
  port: 8761

eureka:
  instance:
    hostname: peer1  # 当指定profiles=peer1时,主机名为peer1
    lease-expiration-duration-in-seconds: 60 # 未收到心跳的间隔时间,即服务续约到期时间(缺省为90s)
    prefer-ip-address: true

  client:
    register-with-eureka: false
    fetch-registry: false

    # 地区
    region: Guangzhou
    service-url:
      defaultZone: http://peer2:8762/eureka/,http://peer3:8763/eureka/ # 声明对等体(默认要存在对等体,否则会有红色警告)

---

spring:
  profiles: peer2
server:
  port: 8762

eureka:
  instance:
    hostname: peer2
    lease-expiration-duration-in-seconds: 60 # 未收到心跳的间隔时间,即服务续约到期时间(缺省为90s)

  client:
    register-with-eureka: false
    fetch-registry: false

    # 地区
    region: Guangzhou
    service-url:
      defaultZone: http://peer1:8761/eureka/,http://peer3:8763/eureka/

---

spring:
  profiles: peer3
server:
  port: 8763

eureka:
  instance:
    hostname: peer3
    lease-expiration-duration-in-seconds: 60 # 未收到心跳的间隔时间,即服务续约到期时间(缺省为90s)

  client:
    register-with-eureka: false
    fetch-registry: false

    # 地区
    region: Guangzhou
    service-url:
      defaultZone: http://peer1:8761/eureka/,http://peer2:8762/eureka/
- producer
server:
  port: 8081  # 服务端口号

eureka:
  instance:
      lease-renewal-interval-in-seconds: 10 # client 隔多久去拉取服务注册信息,默认为30秒
      prefer-ip-address: true # 客户端在注册时就会使用自己的ip地址而不是主机名
      metadata-map:
        zone: zone-1 # 声明 Eureka Server 的所在区域(优先在那里注册)
  client:
    registry-fetch-interval-seconds: 8 # 心跳时间,即服务续约间隔时间(缺省为30s)
    register-with-eureka: true
    fetch-registry: true
    prefer-same-zone-eureka: true

    # 地区
    region: Guangzhou
    availability-zones:
      Guangzhou: zone-1, zone-2, zone-3 # 机房列表 优先使用首位置中声明的机房中的服务
    service-url:
      zone-1: http://peer1:8761/eureka/
      zone-2: http://peer2:8762/eureka/
      zone-3: http://peer3:8763/eureka/

# 生产者服务名
spring:
  profiles: producer01
  application:
    name: producer01  # 调用的时候根据名称来调用该服务的方法

---

server:
  port: 8082  # 服务端口号

eureka:
  instance:
    lease-renewal-interval-in-seconds: 10 # client 隔多久去拉取服务注册信息,默认为30秒
    prefer-ip-address: true # 客户端在注册时就会使用自己的ip地址而不是主机名
    metadata-map:
      zone: zone-2  # 声明 Eureka Server 的所在区域(优先在那里注册)
  client:
    registry-fetch-interval-seconds: 8 # 心跳时间,即服务续约间隔时间(缺省为30s)
    register-with-eureka: true
    fetch-registry: true
    prefer-same-zone-eureka: true

    # 地区
    region: Guangzhou
    availability-zones:
      Guangzhou: zone-2, zone-1, zone-3 # 机房列表 优先使用首位置中声明的机房中的服务
    service-url:
      zone-1: http://peer1:8761/eureka/
      zone-2: http://peer2:8762/eureka/
      zone-3: http://peer3:8763/eureka/

# 生产者服务名
spring:
  profiles: producer02
  application:
    name: producer02  # 调用的时候根据名称来调用该服务的方法
- consumer
server:
  port: 8888

eureka:
  instance:
    prefer-ip-address: true
    lease-renewal-interval-in-seconds: 10  # client 隔多久去拉取服务注册信息,默认为30秒
    metadata-map:
      zone: zone-1 # 声明 Eureka Server 的所在区域
  client:
    registry-fetch-interval-seconds: 8 # 心跳时间,即服务续约间隔时间(缺省为30s)
    register-with-eureka: true
    fetch-registry: true
    prefer-same-zone-eureka: true

    # 地区
    region: Guangzhou
    availability-zones:
      Guangzhou: zone-1, zone-2, zone-3 # 机房列表 优先使用首位置中声明的机房中的服务
    service-url:
      zone-1: http://peer1:8761/eureka/
      zone-2: http://peer2:8762/eureka/
      zone-3: http://peer3:8763/eureka/

# 消费者服务名
spring:
  application:
    name: consumer01
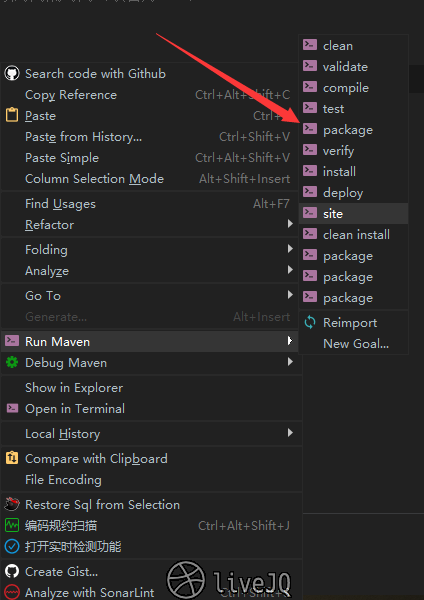
Maven 打包运行
打包请参考官方说明:Spring Boot Maven 插件
架构在 spring boot 之上的 spring cloud 也可以通过命名约定按照一定的格式(application-.properties)来定义多个配置文件,然后通过在application.properyies通过spring.profiles.active来具体激活一个或者多个配置文件。这里我们不在 application.properyies 文件中指定spring.profiles.active 属性,我们通过 java -jar 的方式指定这个属性。
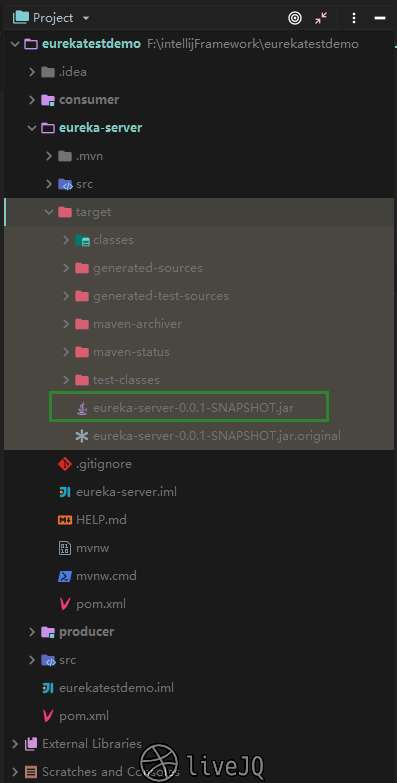
- 进入 jar 包目录,在 CLI 键入命令启动:
$ java -jar eureka-server-0.0.1-SNAPSHOT.jar --spring.profiles.active=peer1


	2019-06-19 13:11:17 trationDelegate$BeanPostProcessorChecker : Bean 'org.springframework.cloud.autoconfigure.ConfigurationPropertiesRebinderAutoConfiguration' of type [org.springframework.cloud.autoconfigure.ConfigurationPropertiesRebinderAutoConfiguration$$EnhancerBySpringCGLIB$$74902fc0] is not eligible for getting processed by all BeanPostProcessors (for example: not eligible for auto-proxying)

	  .   ____          _            __ _ _
	 /\\ / ___'_ __ _ _(_)_ __  __ _ \ \ \ \
	( ( )\___ | '_ | '_| | '_ \/ _` | \ \ \ \
	 \\/  ___)| |_)| | | | | || (_| |  ) ) ) )
	  '  |____| .__|_| |_|_| |_\__, | / / / /
	 =========|_|==============|___/=/_/_/_/
	 :: Spring Boot ::        (v2.1.5.RELEASE)

	....
	....
	....
	2019-06-19 13:11:25 o.s.c.n.e.server.EurekaServerBootstrap   : Initialized server context
	2019-06-19 13:11:25 c.n.e.r.PeerAwareInstanceRegistryImpl    : Got 1 instances from neighboring DS node
	2019-06-19 13:11:25 c.n.e.r.PeerAwareInstanceRegistryImpl    : Renew threshold is: 1
	2019-06-19 13:11:25 c.n.e.r.PeerAwareInstanceRegistryImpl    : Changing status to UP
	2019-06-19 13:11:25 e.s.EurekaServerInitializerConfiguration : Started Eureka Server
	2019-06-19 13:11:25 o.s.b.w.embedded.tomcat.TomcatWebServer  : Tomcat started on port(s): 8761 (http) with context path ''
	2019-06-19 13:11:25 s.c.n.e.s.EurekaAutoServiceRegistration : Updating port to 8761
	2019-06-19 13:11:25 c.l.e.EurekaServerApplication            : Started EurekaServerApplication in 8.832 seconds (JVM running for 9.324)
	2019-06-19 13:12:25 c.n.e.registry.AbstractInstanceRegistry  : Running the evict task with compensationTime 0ms
	2019-06-19 13:13:25 c.n.e.registry.AbstractInstanceRegistry  : Running the evict task with compensationTime 0ms
	2019-06-19 13:14:25 c.n.e.registry.AbstractInstanceRegistry  : Running the evict task with compensationTime 0ms
由上面运行的 Eureka Server 后面信息可以看到,设置的 lease-expiration-duration-in-seconds: 60 [未收到心跳的间隔时间,即服务续约到期时间(缺省为90s)],它每隔 60s 定时执行心跳检查任务。
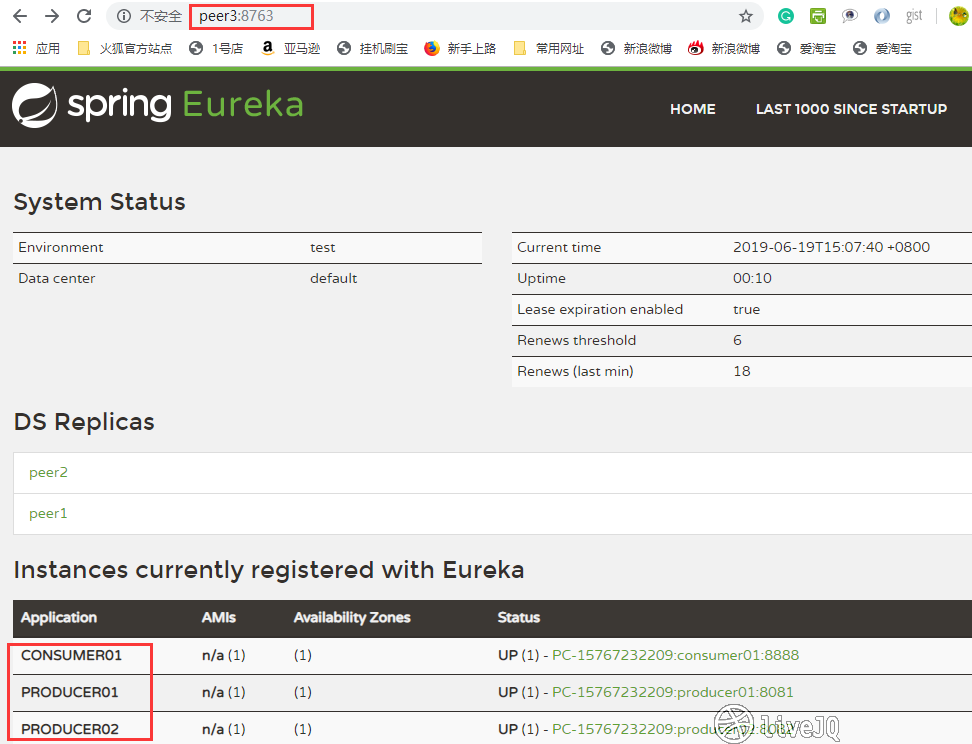
之后依次启动另外 2 个 Eureka Server 和 其它 3 个的 Client。
启动客户端后,请耐心等待片刻,服务器和客户端在其本地缓存中都具有相同的元数据之前,客户端无法发现服务(因此可能需要3次心跳)。您可以通过设置更改期间eureka.instance.leaseRenewalIntervalInSeconds。将其设置为小于30的值会加快使客户端连接到其他服务的过程。
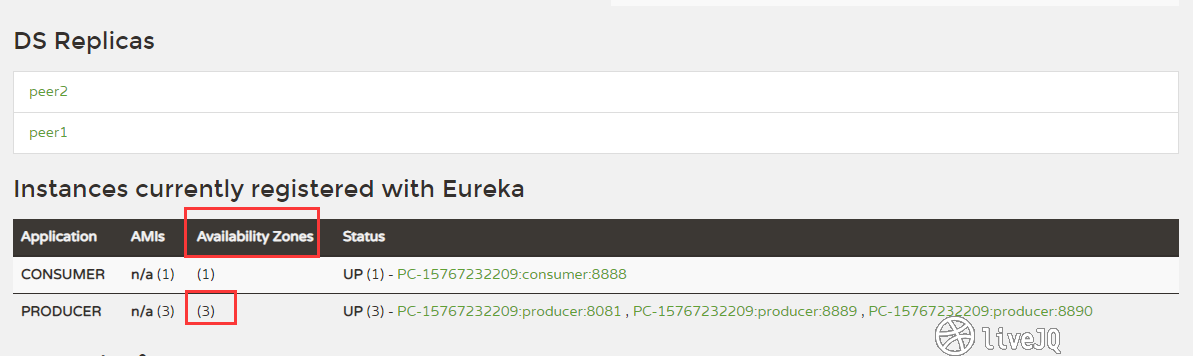
- replication=true 表明 producer 已注册相关信息并已同步到其它对等 eureka server 服务
2019-06-19 14:57:40 o.s.web.servlet.DispatcherServlet        : Completed initialization in 12 ms
2019-06-19 14:57:43 c.n.e.registry.AbstractInstanceRegistry  : Running the evict task with compensationTime 0ms
2019-06-19 14:58:43 c.n.e.registry.AbstractInstanceRegistry  : Running the evict task with compensationTime 0ms
2019-06-19 14:58:54 c.n.e.registry.AbstractInstanceRegistry  : Registered instance PRODUCER01/`PC-15767232209:producer01:8081` with status UP (replication=true)
2019-06-19 15:42:23 c.n.d.s.r.aws.ConfigClusterResolver      : Resolving eureka endpoints via configuration
2019-06-19 15:47:23 c.n.d.s.r.aws.ConfigClusterResolver      : Resolving eureka endpoints via configuration
2019-06-19 15:52:23 c.n.d.s.r.aws.ConfigClusterResolver      : Resolving eureka endpoints via configuration
2019-06-19 15:57:23 c.n.d.s.r.aws.ConfigClusterResolver      : Resolving eureka endpoints via configuration

peer1、peer2与此相同(producer01是先注册到peer1,然后同步数据到peer2、peer3,然后这些数据则被 eureka client 同步拉取到本地缓存起来),客户端根据所需服务,可以在缓存的注册信息中找到并定时向注册中心发出 renew 更新请求,这个请求可以指定(eureka.instance.metadataMap.zone=zone-1)发送到离自己较近的区域
zone,失败后再转向其他服务。任意一个 eureka server 崩了都不会影响到生产和消费的正常运行,待服务重启成功后,又会加入 DS Replicate 队列,从而实现了高可用的效果。
Spring Cloud Ribbon 实现客户端负载均衡
问题描述:
调用 spring boot 服务的时候,需要将服务的URL写死或者是写在配置文件中,但这两种方式,无论哪一种,一旦ip地址发生了变化,都需要改动程序,并重新部署服务,使用Ribbon的时候,可以有效的避免这个问题。
软负载均衡的实现方式:
1.服务端的负载均衡
当浏览器向后台发出请求的时候,会首先向反向代理服务器发送请求,反向代理服务器会根据客户端部署的ip:port映射表以及负载均衡策略,来决定向哪台服务器发送请求,一般会使用到nginx反向代理技术。
2.客户端的负载均衡
当浏览器向后台发出请求的时候,客户端会向服务注册器(例如:Eureka Server),拉取注册到服务器的可用服务信息,然后根据负载均衡策略,直接命中哪台服务器发送请求。这整个过程都是在客户端完成的,并不需要反向代理服务器的参与。
Netflix ribbon 提供了以下功能:
1、负载均衡
2、故障容错
3、支持多种协议(HTTP, TCP, UDP)
<dependency>
    <groupId>org.springframework.cloud</groupId>
    <artifactId>spring-cloud-starter-netflix-ribbon</artifactId>
    <version>2.1.1.RELEASE</version>
</dependency>
由上面可知,spring-cloud-starter-eureka-server 包含了这个依赖,最后得在 client 端加上即可。
Eureka Server 配置基本不变,主要修改消费者,然后在生产者中输出其端口来检验是否达到负载均衡效果。
生产者的 application.yml 中只留一个配置即可(不需要设置profiles),增添一个 SayHelloController,如下:
import org.slf4j.Logger;
import org.slf4j.LoggerFactory;
import org.springframework.beans.factory.annotation.Autowired;
import org.springframework.boot.SpringApplication;
import org.springframework.core.env.Environment;
import org.springframework.web.bind.annotation.*;

import java.util.Arrays;
import java.util.List;
import java.util.Random;

/**
 * 描述: 处理相关的请求
 * Created by livejq
 * 2019-06-17 20:23
 **/
@RestController
public class SayHelloController {

    private static Logger log = LoggerFactory.getLogger(SayHelloController.class);

    @Autowired
    private Environment environment;

    @RequestMapping(value = "/greeting")
    public String greet() {
        log.info("Access /greeting");

        String serverPort = environment.getProperty("local.server.port");

        List<String> greetings = Arrays.asList("你好!", "我好!", "大家好!");
        Random rand = new Random();

        int randomNum = rand.nextInt(greetings.size());
        return greetings.get(randomNum) + ",端口号:" + serverPort;
    }

    @RequestMapping(value = "/")
    public String home() {
        log.info("Access /");
        String serverPort = environment.getProperty("local.server.port");

        return "Hi!" + ",端口号:" + serverPort;
    }

    public static void main(String[] args) {
        SpringApplication.run(SayHelloController.class, args);
    }
消费者中的 application.yml 添加:
spring:
  application:
    name: consumer

consumer:
  ribbon:
    eureka:
      enabled: true
    #listOfServers: peer1:8081,peer2:8082,peer3:8083 # 从这三个服务中选取(写死)
    ServerListRefreshInterval: 15000
然后新建一个 UserController 如下:
package com.livejq.consumer;

import org.springframework.beans.factory.annotation.Autowired;
import org.springframework.beans.factory.annotation.Value;
import org.springframework.context.annotation.Bean;
import org.springframework.web.bind.annotation.*;
import org.springframework.web.client.RestTemplate;

import java.util.concurrent.atomic.AtomicInteger;

/**
 * @author mayn
 * @date 2019/6/19
 **/
@RestController
public class UserController {

    @Bean
    RestTemplate restTemplate(){
        return new RestTemplate();
    }

    @Autowired
    RestTemplate restTemplate;

    @Value("${server.port}")
    private String port;

    private AtomicInteger index = new AtomicInteger(0);

    @RequestMapping("/hi")
    public String hi(@RequestParam(value="name", defaultValue="livejq") String name) {
        String greeting = this.restTemplate.getForObject("http://producer/greeting", String.class);

        return String.format("%s, %s!", greeting, name);
    }
}
消费者中最重要的一点是在主程序中声明负载均衡的相关 bean 的注解以便获取实例,并需要声明其相关的配置信息Configuration。
package com.livejq.consumer;

import com.livejq.consumer.loadbalance.SayHelloConfiguration;
import org.springframework.boot.SpringApplication;
import org.springframework.boot.autoconfigure.SpringBootApplication;
import org.springframework.cloud.client.loadbalancer.LoadBalanced;
import org.springframework.cloud.netflix.eureka.EnableEurekaClient;
import org.springframework.cloud.netflix.ribbon.RibbonClient;
import org.springframework.context.annotation.Bean;
import org.springframework.web.client.RestTemplate;


@EnableEurekaClient
@SpringBootApplication
@RibbonClient(name = "consumer", configuration = SayHelloConfiguration.class)
public class ConsumerApplication {

    @Bean
    @LoadBalanced   // 添加负载均衡
    public RestTemplate getRestTemplate(){
        return  new RestTemplate();
    }

    public static void main(String[] args) {
        SpringApplication.run(ConsumerApplication.class, args);
    }
}
SayHelloConfiguration 是负载均衡的配置类,我们一般直接使用其本身提供的一些功能(负载算法等),也可可自定义。一般这个类得写在单独的包中,若与主程序放在一起,则全局都会使用这个配置。
package com.livejq.consumer.loadbalance;

import org.springframework.beans.factory.annotation.Autowired;
import org.springframework.context.annotation.Bean;

import com.netflix.client.config.IClientConfig;
import com.netflix.loadbalancer.IPing;
import com.netflix.loadbalancer.IRule;
import com.netflix.loadbalancer.PingUrl;
import com.netflix.loadbalancer.AvailabilityFilteringRule;

/**
 * @author mayn
 * @date 2019/6/19
 **/

public class SayHelloConfiguration {

    @Autowired
    IClientConfig ribbonClientConfig;

    @Bean
    public IPing ribbonPing(IClientConfig config) {
        return new PingUrl();
    }

    @Bean
    public IRule ribbonRule(IClientConfig config) {
        return new AvailabilityFilteringRule();
    }

}
- 最后跟上面一样打包jar,然后运行多个服务来测试。
可获取的服务地区有 3 个,若没有在消费者的配置信息中声明consumer.ribbon.listOfServers=xx:port,....,则可以通过命令直接再开启一个不同端口的服务,然后会自动加入进来。命令为:
java -jar xxx-snapshot-xx.jar --server.port=xxxx
测试可使用命令:
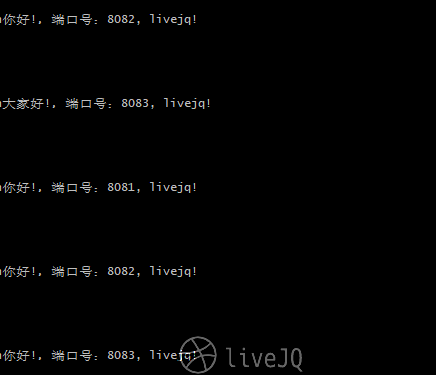
curl http://localhost:8888/hi
运行多次后输出的结果如下:
保护Eureka服务器
只需将 Spring Security 添加到服务器的类路径中即可保护 Eureka 服务器 spring-boot-starter-security。默认情况下,当 Spring Security 位于类路径上时,它将要求在应用程序的每个请求中发送有效的CSRF令牌。Eureka 客户端通常不会拥有有效的跨站点请求伪造(CSRF)令牌,您需要为 /eureka/** 端点禁用此要求。
@EnableWebSecurity
class WebSecurityConfig extends WebSecurityConfigurerAdapter {

    @Override
    protected void configure(HttpSecurity http) throws Exception {
        http.csrf().ignoringAntMatchers("/eureka/**");
        super.configure(http);
    }
}
有待探究......
源代码地址:
参考资料:
- Github Eureka
- Spring Cloud Netflix
- service-registration-and-discovery
- Spring Boot Maven 插件
- Eureka 服务注册与发现
- Spring Boot + Eureka 实现微服务负载均衡
- Springcloud 中的 region 和 zone的使用
- DS Replicas 是什么
- 浅谈集群和分布式
- @EnableDiscoveryClient与@EnableEurekaClient区别
- 使用功能区和 Spring Cloud 进行客户端负载平衡
- application.properties 和 bootstrap.yml 区别
- 为什么CPU主频提升的越来越慢呢?


评论区