


概述
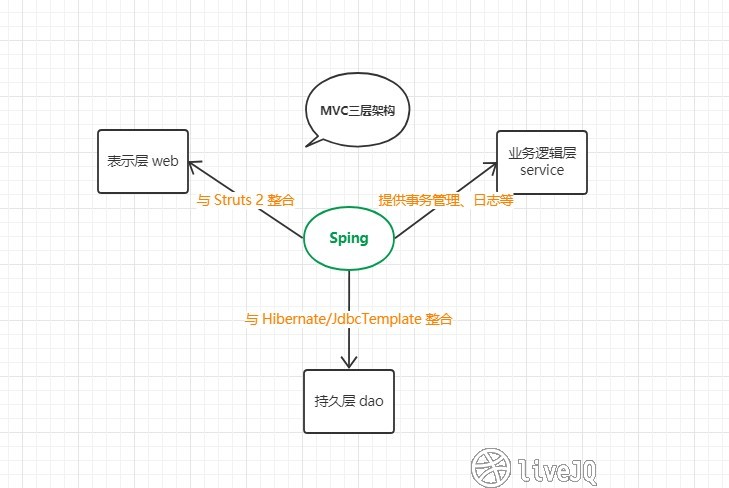
- Spring 是分层的 Java SE/EE full-stack 轻量级开源框架,以
IoC和AOP为内核,取代 EJB 的臃肿,低效的开发模式。 - Spring 框架的目标是使 J2EE 开发变得更容易使用,通过启用基于 POJO 编程模型来促进良好的编程实践。
Spring 框架优点
- Spring 具有简单、可测试和松耦合的特点,因此,Spring 不仅可以用于服务器端的开发,也可以应用于任何 Java 应用的开发中。
典型的SSH架构
主要优点如下
- 方便解耦,简化开发:Spring 就像一个大工厂,可以将所有对象的创建和依赖关系都交由 Spring 来管理。
- AOP 编程的支持:提供面向切面编程,很容易实现对程序进行权限拦截、运行监控等功能。
- 声明式事务的支持:只需通过配置即可完成对事务的管理,无需手动编程。
- 方便程序的测试:可通过注解测试 Spring 应用。各版本 Spring 对 JUnit 的版本要求不同(目前常用4.12)。
- 方便集成各种优秀的框架:
其内部提供了对诸如(Struts2、Hibernate、MyBatis、Quartz)等框架的直接支持。 - 降低 Java API 的使用难度:Spring 对 Java EE 中一些非常难用的 API(如:JDBC/JavaMail、远程调用等)提供了封装。
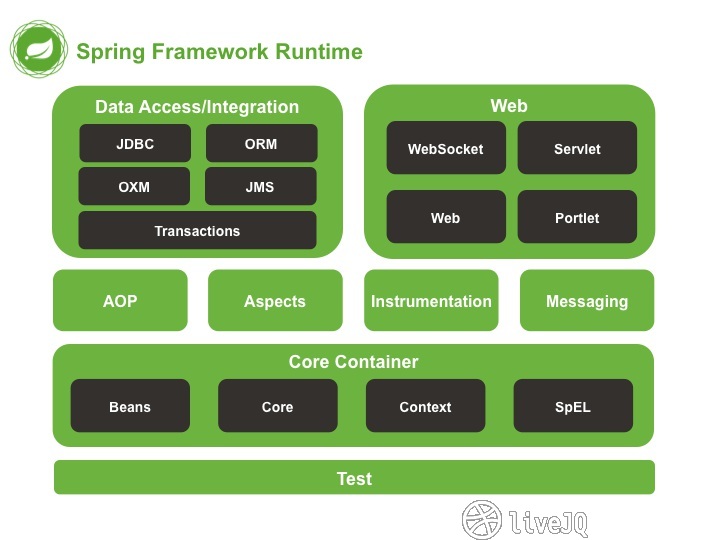
Core Container 核心容器是其它模块建立的基础,所以初始时必须有的 jar 包如下
spring-core.xx.jar
spring-beans.xx.jar
spring-context.xx.jar
spring-expression.xx.jar
commons-logging-xx.jar(spring-core 的依赖,处理日志)
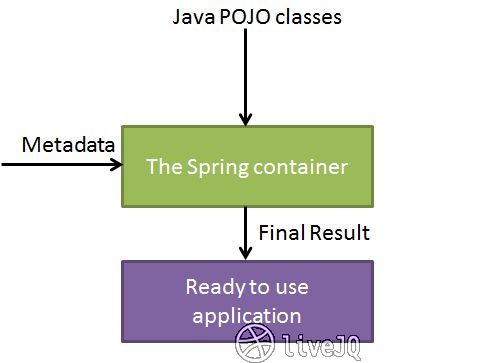
Spring IoC 容器
-
Spring 最认同的技术是控制反转的依赖注入(DI)模式。控制反转(IoC)是一个通用的概念,它可以用许多不同的方式去表达,依赖注入仅仅是控制反转的一个具体的例子。
-
IOC 容器具有依赖注入功能的容器,它可以创建对象,IOC 容器负责实例化、定位、配置应用程序中的对象及建立这些对象间的依赖。通常new一个实例,控制权由程序员控制,而"控制反转"是指new实例工作不由程序员来做而是交给Spring容器来做。
-
当编写一个复杂的 Java 应用程序时,应用程序类应该尽可能的独立于其他的 Java 类来增加这些类可重用可能性,当进行单元测试时,可以使它们独立于其他类进行测试。依赖注入(或者有时被称为配线)有助于将这些类粘合在一起,并且在同一时间让它们保持独立。
BeanFactory 接口
org.springframework.beans.factory.BeanFactor
在 Spring 中,有大量对 BeanFactory 接口的实现。其中,最常被使用的是 XmlBeanFactory 类。这个容器从一个 XML 文件中读取配置元数据,由这些元数据来生成一个被配置化的系统或者应用。
XmlBeanFactory beanFactory = new XmlBeanFactory(new ClassPathResource("bean.xml"));

HelloWorld helloWorld = (HelloWorld)beanFactory.getBean("helloWorld");

helloWorld.xxx(xx);
ApplicationContext 接口
org.springframework.context.ApplicationContext interface
ApplicationContext 是 BeanFactory 的子接口,也被成为 Spring 上下文。
在资源宝贵的移动设备或者基于 applet 的应用当中, BeanFactory 会被优先选择。否则,一般使用的是 ApplicationContext,除非你有更好的理由选择 BeanFactory。
String xmlPath = "applicationContext.xml";
        ApplicationContext applicationContext = new ClassPathXmlApplicationContext(xmlPath);
        UserDao userDao = (UserDao) applicationContext.getBean("userDao");
        userDao.save();
Spring Bean 定义
bean 定义包含称为配置元数据的信息,下述容器也需要知道配置元数据
-
如何创建一个 bean
-
bean 的生命周期的详细信息
-
bean 的依赖关系
上述所有的配置元数据转换成一组构成每个 bean 定义的下列属性。
| 属性 | 描述 |
|---|---|
| class | 这个属性是强制性的,并且指定用来创建 bean 的 bean 类。 |
| name | 这个属性指定唯一的 bean 标识符。在基于 XML 的配置元数据中,你可以使用 ID 和/或 name 属性来指定 bean 标识符。 |
| scope | 这个属性指定由特定的 bean 定义创建的对象的作用域。 |
| constructor-arg | 它是通过构造函数来注入依赖关系的 |
| properties | 它是通过setter方法来注入依赖关系的 |
| lazy-init | 延迟初始化的 bean 告诉 IoC 容器在它第一次被请求时,而不是在启动时去创建一个 bean 实例。 |
| init-method | 在 bean 的所有必需的属性被容器设置之后,调用回调方法。 |
| destroy-method | 当包含该 bean 的容器被销毁时,使用回调方法。 |
Bean 的作用域
当在 Spring 中定义一个 bean 时,你必须声明该 bean 的作用域的选项。
| 作用域 | 描述 |
|---|---|
| singleton | 在spring IoC容器仅存在一个Bean实例,Bean以单例方式存在,默认值 |
| prototype | 每次从容器中调用Bean时,都返回一个新的实例,即每次调用getBean()时,相当于执行newXxxBean() |
| request | 每次HTTP请求都会创建一个新的Bean,该作用域仅适用于WebApplicationContext环境 |
| session | 同一个HTTP Session共享一个Bean,不同Session使用不同的Bean,仅适用于WebApplicationContext环境 |
| global-session | 一般用于Portlet应用环境,该运用域仅适用于WebApplicationContext环境 |
- singleton 作用域
singleton 是默认的作用域,也就是说,当定义 Bean 时,如果没有指定作用域配置项,则 Bean 的作用域被默认为 singleton。
Singleton是单例类型,就是在创建起容器时就同时自动创建了一个bean的对象,不管你是否使用,他都存在了,每次获取到的对象都是同一个对象。
<bean id="..." class="..." scope="singleton">
xxx
</bean>
调用返回实例地址相同。
- prototype 作用域:
Prototype是原型类型,它在我们创建容器的时候并没有实例化,而是当我们获取bean的时候才会去创建一个对象,而且我们每次获取到的对象都不是同一个对象。
<bean id="..." class="..." scope="prototype">
xxx
</bean>
调用返回实例地址不同。
Bean 的生命周期
Bean的生命周期可以表达为:Bean的定义——Bean的初始化——Bean的使用——Bean的销毁
有两种方式来定义初始化或者销毁后回调的方法:
- 通过实现接口
public class ExampleBean implements DisposableBean {
   public void destroy() {
      // do some destruction work
   }
}

public class ExampleBean implements InitializingBean {
   public void afterPropertiesSet() {
      // do some initialization work
   }
}
- 通过xml定义(推荐)
<bean id="userDao" class="com.livejq.ioc.UserDaoImpl"/>
	<bean id="userService" class="com.livejq.ioc.UserServiceImpl" init-method="init" destroy-method="destroy">
		<property name="userDao" ref="userDao"/>
	</bean>
使用 @Test 测试
String xmlPath = "bean1.xml";
        Abstra
ctApplicationContext applicationContext = new ClassPathXmlApplicationContext(xmlPath);
		UserDao userDao = (UserDao)applicationContext.getBean("userDao");
		userDao.save();
		applicationContext.registerShutdownHook();
在这里,你需要注册一个在 AbstractApplicationContext 类中声明的关闭 hook 的 registerShutdownHook() 方法。它将确保正常关闭,并且调用相关的 destroy 方法。
输出结果
Bean is going through init.
spring: hello user dao

Disconnected from the target VM, address: '127.0.0.1:50374', transport: 'socket'

Bean will destroy now.
Bean 后置处理器 BeanPostProcessor
org.springframework.beans.factory.config.BeanPostProcessor
Bean 后置处理器允许在调用初始化方法前后对 Bean 进行额外的处理。
BeanPostProcessor 接口定义回调方法,你可以实现该方法来提供自己的实例化逻辑,依赖解析逻辑等。
ApplicationContext 会自动检测由 BeanPostProcessor 接口的实现定义的 bean,注册这些 bean 为后置处理器,然后通过在容器中创建 bean,在适当的时候调用它。
public class InitUserService implements BeanPostProcessor {
    @Override
    public Object postProcessBeforeInitialization(Object bean, String beanName) throws BeansException {
        System.out.println("BeforeInitialization : " + beanName);
        return bean;  // you can return any other object as well
    }

    @Override
    public Object postProcessAfterInitialization(Object bean, String beanName) throws BeansException {
        System.out.println("AfterInitialization : " + beanName);
        return bean;  // you can return any other object as well
    }
}
配置与上面相同,只是再添加
<bean class="com.livejq.ioc.InitUserService"/>
输出结果
BeforeInitialization : userDao
AfterInitialization : userDao
BeforeInitialization : userService
AfterInitialization : userService
spring: hello user dao
Bean 定义继承
bean 定义可以包含很多的配置信息,包括构造函数的参数,属性值,容器的具体信息例如初始化方法,静态工厂方法名,等等。
子 bean 的定义继承父定义的配置数据。子定义可以根据需要重写一些值,或者添加其他值。
Spring Bean 定义的继承与 Java 类的继承无关,但是继承的概念是一样的。你可以定义一个父 bean 的定义作为模板和其他子 bean 就可以从父 bean 中继承所需的配置。
首先定义两个 POJO 类,然后配置 xml,如下
<bean id="hello01" class="com.livejq.ioc.Hello01">
        <property name="msg1" value="属性1"/>
    </bean>
    <bean id="hello02" class="com.livejq.ioc.Hello02" parent="hello01">
        <!--<property name="msg1" value="属性1"/>不声明,继承父定义-->
        <property name="msg2" value="属性2"/>
    </bean>
输出结果
属性1
-----------------------
-----------------------
属性1
属性2
- 定义模板
上面的 xml 配置也可以不声明 class ,直接定义为 abstract 来作为模板(与继承不同的时,必须声明声明所有用到的属性的值)。
<bean id="hello01" abstract="true">
        <property name="msg1" value="属性1"/>
        <property name="msg2" value="属性2"/>
    </bean>
    <bean id="hello02" class="com.livejq.ioc.Hello02" parent="hello01">
        <!--<property name="msg1" value="属性1"/>不声明,采用模板中的定义-->
        <property name="msg2" value="属性2"/>
    </bean>
Spring 依赖注入(DI)
首先定义一个 Bean,为下文使用:
public class User {
	private String username;
	public String getUsername() {
		return username;
	}
	public void setUsername(String username) {
		this.username = username;
	}
	public String getPassword() {
		return password;
	}
	public void setPassword(String password) {
		this.password = password;
	}
	private String password;


	public User() {
		super();
	}

	/**
	 * 通过自定义构造方法(带参数) 实现依赖注入
	 */
	public User(String username, String password) {
		super();
		this.username = username;
		this.password = password;
	}

	@Override
	public String toString() {
		return "User [ username = " + username +",  passwrod = " + password + "]";
	}

}
提供无参构造方法是给 Spring 容器使用。
通过构造函数注入
当容器调用带有一组参数的类构造函数时,基于构造函数的 DI 就完成了,其中每个参数代表一个对其他类的依赖。
<!-- 使用构造方法装配user实例 -->
	<bean id="user1" class="com.livejq.assemble.User" scope="prototype">
		<constructor-arg index="0" value="zhl" />
		<constructor-arg index="1" value="123" />
	</bean>
通过setter函数注入
<!-- 使用Setter装配user实例 -->
	<bean id="user2" class="com.livejq.assemble.User" scope="prototype">
		<property name="username" value="livejq" />
		<property name="password" value="456" />
	</bean>
输出结果
正在创建Bean2......
User [ username = zhl,  passwrod = 123]
User [ username = livejq,  passwrod = 456]
Disconnected from the target VM, address: '127.0.0.1:51010', transport: 'socket'

Process finished with exit code 0
注入 bean
上面是注入普通属性值,而注入一个外部引用类则可以
<bean id="userService" class="com.livejq.ioc.UserServiceImpl">
		<property name="userDao">
            <bean id="userDao" class="com.livejq.ioc.UserDaoImpl"/><!-- 注入内部 bean ,等价于 ref=“id值”-->
        </property>
	</bean>
等价于
<bean id="userDao" class="com.livejq.ioc.UserDaoImpl"/>

<bean id="userService" class="com.livejq.ioc.UserServiceImpl">
		<property name="userDao" ref="userDao"/>
	</bean>
注入集合
public class JavaCollection {
    List addressList;
    Set addressSet;
    Map addressMap;
    Properties addressProp;

    public List getAddressList() {
        return addressList;
    }

    public void setAddressList(List addressList) {
        this.addressList = addressList;
    }

    public Set getAddressSet() {
        return addressSet;
    }

    public void setAddressSet(Set addressSet) {
        this.addressSet = addressSet;
    }

    public Map getAddressMap() {
        return addressMap;
    }

    public void setAddressMap(Map addressMap) {
        this.addressMap = addressMap;
    }

    public Properties getAddressProp() {
        return addressProp;
    }

    public void setAddressProp(Properties addressProp) {
        this.addressProp = addressProp;
    }

    @Override
    public String toString() {
        System.out.print("----List:");
        for(Object i : addressList) {
            System.out.print(i.toString()+" ");
        }
        System.out.println();
        System.out.print("----Map:");
        for(Object m : addressMap.values()){
            System.out.print(m+" ");
        }
        System.out.println();

        System.out.print("----Set:");
        for(Object i : addressSet) {
            System.out.print(i.toString()+" ");
        }
        System.out.println();

        System.out.print("----Properties:");
        for (String key : addressProp.stringPropertyNames()) {
            System.out.print(addressProp.getProperty(key)+" ");
        }
        return super.toString();
    }
}
xml配置
<!-- Definition for javaCollection -->
    <bean id="javaCollection" class="com.livejq.ioc.JavaCollection">

        <!-- results in a setAddressList(java.util.List) call -->
        <property name="addressList">
            <list>
                <value>you</value>
                <value>me</value>
                <value>it</value>
                <value>them</value>
            </list>
        </property>

        <!-- results in a setAddressSet(java.util.Set) call -->
        <property name="addressSet">
            <set>
                <value>you</value>
                <value>me</value>
                <value>it</value>
                <value>them</value>
            </set>
        </property>

        <!-- results in a setAddressMap(java.util.Map) call -->
        <property name="addressMap">
            <map>
                <entry key="1" value="you"/>
                <entry key="2" value="me"/>
                <entry key="3" value="it"/>
                <entry key="4" value="them"/>
            </map>
        </property>

        <!-- results in a setAddressProp(java.util.Properties) call -->
        <property name="addressProp">
            <props>
                <prop key="one">you</prop>
                <prop key="two">me</prop>
                <prop key="three">it</prop>
                <prop key="four">them</prop>
            </props>
        </property>

    </bean>
输出结果
----List:you me it them
----Map:you me it them
----Set:you me it them
----Properties:me you it them
Process finished with exit code 0
Spring AOP
-
Spring 框架的一个关键组件是面向方面的程序设计(AOP)框架。一个程序中跨越多个点的功能被称为横切关注点,这些横切关注点在概念上独立于应用程序的业务逻辑。有各种各样常见的很好的关于方面的例子,比如日志记录、声明性事务、安全性,和缓存等等。
-
在 OOP 中模块化的关键单元是类,而在 AOP 中模块化的关键单元是方面。AOP 帮助你将横切关注点从它们所影响的对象中分离出来,然而依赖注入帮助你将你的应用程序对象从彼此中分离出来。
-
Spring 框架的 AOP 模块提供了面向方面的程序设计实现,可以定义诸如方法拦截器和切入点等,从而使实现功能的代码彻底的解耦出来。
AOP 术语
| 项 | 描述 |
|---|---|
| Aspect | 一个模块具有一组提供横切需求的 APIs。例如,一个日志模块为了记录日志将被 AOP 方面调用。应用程序可以拥有任意数量的方面,这取决于需求。 |
| Join point | 在你的应用程序中它代表一个点,你可以在插件 AOP 方面。你也能说,它是在实际的应用程序中,其中一个操作将使用 Spring AOP 框架。 |
| Advice | 这是实际行动之前或之后执行的方法。这是在程序执行期间通过 Spring AOP 框架实际被调用的代码。 |
| Pointcut | 这是一组一个或多个连接点,通知应该被执行,你可以使用表达式或模式指定切入点。 |
| Introduction | 引用允许你添加新方法或属性到现有的类中。 |
| Target object | 被一个或者多个方面所通知的对象,这个对象永远是一个被代理对象。也称为被通知对象。 |
| Weaving | Weaving 把方面连接到其它的应用程序类型或者对象上,并创建一个被通知的对象。这些可以在编译时,类加载时和运行时完成。 |
通知的类型
- Spring 方面可以使用下面提到的五种通知工作:
| 通知 | 描述 |
|---|---|
| 前置通知 | 在一个方法执行之前,执行通知。 |
| 后置通知 | 在一个方法执行之后,不考虑其结果,执行通知。 |
| 返回后通知 | 在一个方法执行之后,只有在方法成功完成时,才能执行通知。 |
| 抛出异常后通知 | 在一个方法执行之后,只有在方法退出抛出异常时,才能执行通知。 |
| 环绕通知 | 在建议方法调用之前和之后,执行通知。 |
基于注解的 AspectJ
随便编辑一个接口,然后再建个类去实现它(使用@Repository注解),为了节约篇幅,不再赘述。
MyAspect 类
@Aspect //声明为一个切面类
@Component //将切面类作为一个组件供Spring容器使用
public class MyAspect {
// 通过表达式指定对哪些类进行织入操作
    @Pointcut("execution(* com.livejq.aspectj_aop..*.*(..))")
// 名称自定义,必须 private void,无参
    private void myPointCut(){}

    @Before(value = "myPointCut()")
    public void before(JoinPoint joinPoint) {
        System.out.print("前置通知...");
        System.out.print(joinPoint.getTarget() + "目标方法名称:");
        System.out.println(joinPoint.getSignature().getName());
    }

    @AfterReturning(value="myPointCut()")
    public void afterReturning(JoinPoint joinPoint) {
        System.out.println("后置通知...目标方法名称:" + joinPoint.getSignature().getName());
    }

    @Around(value="myPointCut()")
    public Object around(ProceedingJoinPoint proceedingJoinPoint) throws Throwable {
        System.out.println("环绕开始...");
        Object obj = proceedingJoinPoint.proceed();
        System.out.println("环绕结束");

        return obj;
    }

    @AfterThrowing(value="myPointCut()", throwing = "e")
    public void afterThrowing(JoinPoint joinPoint, Throwable e) {
        System.out.println("出错了..." + e.getMessage());
    }

    @After("myPointCut()")
    public void after() {
        System.out.println("最终通知!");
    }
}
配置 bean.xml
<context:component-scan base-package="com.livejq.aspectj_aop"/>
    <aop:aspectj-autoproxy/>
测试程序
String xmlPath = "applicationContext2.xml";
        ApplicationContext applicationContext = new ClassPathXmlApplicationContext(xmlPath);
        UserDao userDao = (UserDao) applicationContext.getBean("userDao");
        userDao.save();
输出结果
前置通知...com.livejq.aspectj_aop.UserDaoImpl@6ca8564a目标方法名称:save
环绕开始...
正在保存!
最终通知!
环绕结束
后置通知...目标方法名称:save
Spring JDBC 框架
如前所述,同样先创建实体和 Dao 类
UserDaoImpl 实现类
public class UserDaoImpl implements UserDao {

	private JdbcTemplate jdbcTemplate;

	public void setJdbcTemplate(JdbcTemplate jdbcTemplate) {
		this.jdbcTemplate = jdbcTemplate;
	}

	@Override
	public int addUser(User user) {
		// TODO Auto-generated method stub
		String sql = "insert into tb_user (username, password) values(?, ?)";
		Object[] params = new Object[] {
				user.getUsername(),
				user.getPassword()
		};

        return this.jdbcTemplate.update(sql, params);
	}

	@Override
	public int updateUser(User user) {
		// TODO Auto-generated method stub
        String sql = "update tb_user set username = ?," +
                "password = ? where id = ?";
        Object[] params = new Object[] {
                user.getUsername(),
                user.getPassword(),
                user.getId()
        };

        return jdbcTemplate.update(sql, params);
	}

	@Override
	public int deleteUserById(int id) {
		// TODO Auto-generated method stub
        String sql = "delete from tb_user where id = ?";

        return jdbcTemplate.update(sql, id);
	}

    /**
     * 与3.x 用法不同,3.x 使用 ParameteriedBeanPropertyRowMapper.newInstance(User.class) 来
     * 返回一个 RowMapper<User> 对象
     * @param id 编号
     * @return User
     */
    @Override
    public User findUserById(int id) {
	    String sql = "select * from tb_user where id = ?";
        RowMapper<User> rowMapper = new BeanPropertyRowMapper<>(User.class);

        return jdbcTemplate.queryForObject(sql, rowMapper, id);
    }

    @Override
    public List<User> findAllUser() {
        String sql = "select * from tb_user";
        RowMapper<User> rowMapper = new BeanPropertyRowMapper<>(User.class);

        return jdbcTemplate.query(sql, rowMapper);
    }
}
配置 jdbcTemplate.xml
<bean id="dataSource"
	class="org.springframework.jdbc.datasource.DriverManagerDataSource">
		<property name="driverClassName" value="com.mysql.jdbc.Driver"/>
		<property name="url" value="jdbc:mysql://localhost/spring"/>
		<property name="username" value="gzhmt"/>
		<property name="password" value="rj17208zhl"/>
	</bean>
	<bean id="jdbcTemplate"
	class="org.springframework.jdbc.core.JdbcTemplate">
		<property name="dataSource" ref="dataSource"/>
	</bean>
	<bean id="userDao" class="com.livejq.jdbctemplate.UserDaoImpl">
		<property name="jdbcTemplate" ref="jdbcTemplate"/>
	</bean>
测试程序
public class TestJdbcTemplate {
    @Test
    public void testCreateTable() {
        String xmlPath = "jdbcTemplateBeans.xml";
        ApplicationContext applicationContext = new ClassPathXmlApplicationContext(xmlPath);
        JdbcTemplate jdbcTemplate = (JdbcTemplate) applicationContext.getBean("jdbcTemplate");
        jdbcTemplate.execute("create table tb_user(" +
                "id int primary key auto_increment," +
                "username varchar(50)," +
                "password varchar(32))");
        /*jdbcTemplate.execute("create table tb_account(" +
                "id int(11) primary key auto_increment," +
                "name varchar(50) not null," +
                "money int default null)");*/
    }

    @Test
    public void testAddUser() {
        String xmlPath = "jdbcTemplateBeans.xml";
        ApplicationContext applicationContext = new ClassPathXmlApplicationContext(xmlPath);
        UserDao userDao = (UserDao) applicationContext.getBean("userDao");
        User user = new User();
        user.setUsername("livejq");
        user.setPassword("456");
        int flag = userDao.addUser(user);
        System.out.println("flag 返回值为 " + flag);
        if(flag == 0) {
            System.out.println("添加用户成功!");
        }else {
            System.out.println("未能添加用户~");
        }
    }

    @Test
    public void testUpdateUser() {
        String xmlPath = "jdbcTemplateBeans.xml";
        ApplicationContext applicationContext = new ClassPathXmlApplicationContext(xmlPath);
        UserDao userDao = (UserDao) applicationContext.getBean("userDao");
        User user = new User();
        user.setId(3);
        user.setUsername("livejq");
        user.setPassword("789");
        int flag = userDao.updateUser(user);
        System.out.println("flag 返回值为 " + flag);
        if(flag == 1) {
            System.out.println("更新用户成功!");
        }else {
            System.out.println("未能更新用户~");
        }
    }

    @Test
    public void testDeleteUser() {
        String xmlPath = "jdbcTemplateBeans.xml";
        ApplicationContext applicationContext = new ClassPathXmlApplicationContext(xmlPath);
        UserDao userDao = (UserDao) applicationContext.getBean("userDao");
        int flag = userDao.deleteUserById(3);
        System.out.println("flag 返回值为 " + flag);
        if(flag == 1) {
            System.out.println("删除用户成功!");
        }else {
            System.out.println("未能删除用户~");
        }
    }

    @Test
    public void testFindUserById() {
        String xmlPath = "jdbcTemplateBeans.xml";
        ApplicationContext applicationContext = new ClassPathXmlApplicationContext(xmlPath);
        UserDao userDao = (UserDao) applicationContext.getBean("userDao");
        User u = userDao.findUserById(1);
        if(u != null) {
            System.out.println(u.toString());
        }else {
            System.out.println("未查到相关用户~");
        }
    }

    @Test
    public void testFindAllUser() {
        String xmlPath = "jdbcTemplateBeans.xml";
        ApplicationContext applicationContext = new ClassPathXmlApplicationContext(xmlPath);
        UserDao userDao = (UserDao) applicationContext.getBean("userDao");
        List<User> uList = userDao.findAllUser();
        if(uList.size() != 0) {
            for(User u : uList) {
                System.out.println(u.toString());
            }
        }else {
            System.out.println("用户表为空");
        }
    }
}
Spring 事务管理
事务管理是一个重要组成部分,RDBMS 面向企业应用程序,以确保数据完整性和一致性。事务的概念可以描述为具有以下四个关键属性说成是 ACID:
- 原子性:事务应该当作一个单独单元的操作,这意味着整个序列操作要么是成功,要么是失败的。
- 一致性:这表示数据库的引用完整性的一致性,表中唯一的主键等。
- 隔离性:可能同时处理很多有相同的数据集的事务,每个事务应该与其他事务隔离,以防止数据损坏。
- 持久性:一个事务一旦完成全部操作后,这个事务的结果必须是永久性的,不能因系统故障而从数据库中删除。
一个真正的 RDBMS 数据库系统将为每个事务保证所有的四个属性。使用 SQL 发布到数据库中的事务的简单视图如下
- 使用 begin transaction 命令开始事务。
- 使用 SQL 查询语句执行各种删除、更新或插入操作。
- 如果所有的操作都成功,则执行提交操作,否则回滚所有操作。
下面是隔离级别的可能值
| 序号 | 隔离描述 |
|---|---|
| 1 | TransactionDefinition.ISOLATION_DEFAULT,这是默认的隔离级别。 |
| 2 | TransactionDefinition.ISOLATION_READ_COMMITTED,表明能够阻止误读;可以发生不可重复读和虚读。 |
| 3 | TransactionDefinition.ISOLATION_READ_UNCOMMITTED,表明可以发生误读、不可重复读和虚读。 |
| 4 | TransactionDefinition.ISOLATION_REPEATABLE_READ,表明能够阻止误读和不可重复读;可以发生虚读。 |
| 5 | TransactionDefinition.ISOLATION_SERIALIZABLE,表明能够阻止误读、不可重复读和虚读。 |
下面是传播类型的可能值
| 序号 | 传播描述 |
|---|---|
| 1 | TransactionDefinition.PROPAGATION_MANDATORY,支持当前事务;如果不存在当前事务,则抛出一个异常。 |
| 2 | TransactionDefinition.PROPAGATION_NESTED,如果存在当前事务,则在一个嵌套的事务中执行。 |
| 3 | TransactionDefinition.PROPAGATION_NEVER,不支持当前事务;如果存在当前事务,则抛出一个异常。 |
| 4 | TransactionDefinition.PROPAGATION_NOT_SUPPORTED,不支持当前事务;而总是执行非事务性。 |
| 5 | TransactionDefinition.PROPAGATION_REQUIRED,支持当前事务;如果不存在事务,则创建一个新的事务。 |
| 6 | TransactionDefinition.PROPAGATION_REQUIRES_NEW,创建一个新事务,如果存在一个事务,则把当前事务挂起。 |
| 7 | TransactionDefinition.PROPAGATION_SUPPORTS,支持当前事务;如果不存在,则执行非事务性。 |
| 8 | TransactionDefinition.TIMEOUT_DEFAULT,使用默认超时的底层事务系统,或者如果不支持超时则没有。 |
注解事务管理
- AccountDaoImpl:
@Repository("accountDao")
public class AccountDaoImpl implements AccountDao {
    private JdbcTemplate jdbcTemplate;

    public void setJdbcTemplate(JdbcTemplate jdbcTemplate) {
        this.jdbcTemplate = jdbcTemplate;
    }

    @Override
    public int in(String inUser, int money) {
        return jdbcTemplate.update("update tb_account set money = money + ? where name = ?", money, inUser);
    }

    @Override
    public int out(String outUser, int money) {
        return jdbcTemplate.update("update tb_account set money = money - ? where name = ?", money, outUser);
    }
}
- AccountServiceImpl:
@Transactional(propagation = Propagation.REQUIRED, isolation = Isolation.DEFAULT, rollbackFor = Exception.class)
public class AccountServiceImpl implements AccountService {
    private AccountDao accountDao;

    public void setAccountDao(AccountDao accountDao) {
        this.accountDao = accountDao;
    }

    @Override
    public void transfer(String outUser, String inUser, int money) {
        accountDao.in(inUser, money);
        // 模拟断电
//        int i = 10/0;
        accountDao.out(outUser, money);
    }
}
配置xml
<!-- 加载c3p0线程池 配置文件properties -->
    <context:property-placeholder location="classpath:c3p0-db.properties"/>
    <!-- 配置数据源 读取properties文件 -->
    <bean id="dataSource" class="com.mchange.v2.c3p0.ComboPooledDataSource">
        <property name="driverClass" value="${jdbc.driverClass}"/>
        <property name="jdbcUrl" value="${jdbc.jdbcUrl}"/>
        <property name="user" value="${jdbc.user}"/>
        <property name="password" value="${jdbc.password}"/>
    </bean>
    <bean id="jdbcTemplate"
          class="org.springframework.jdbc.core.JdbcTemplate">
        <property name="dataSource" ref="dataSource"/>
    </bean>
    <bean id="accountDao" class="com.livejq.spring_transaction.AccountDaoImpl">
        <property name="jdbcTemplate" ref="jdbcTemplate"/>
    </bean>
    <bean id="accountService" class="com.livejq.spring_transaction.AccountServiceImpl">
        <property name="accountDao" ref="accountDao"/>
    </bean>
    <bean id="transactionManager" class="org.springframework.jdbc.datasource.DataSourceTransactionManager">
        <property name="dataSource" ref="dataSource"/>
    </bean>

    <tx:annotation-driven transaction-manager="transactionManager"/>
测试
public class TestTransaction {

    /**
     * 通过查看
     * Spring官方文档,发现只有把整个Service设为事务控制时,才会进行AOP代理。
     * 如果我们通过一个没有事务的transferProxy方法去调用有事务的transfer方法,是通过this引用进行调用,
     * 没有开启事务,即使发生了RuntimeException也不会回滚。
     */
// 纯xml声明事务
    @Test
    public void testSpringTransaction() {
        String xmlPath = "applicationContext4.xml";
        ApplicationContext applicationContext = new ClassPathXmlApplicationContext(xmlPath);
        AccountService accountService = (AccountService) applicationContext.getBean("accountServiceProxy");
        accountService.transfer("Jack", "Tom", 200);
        System.out.println("转账成功!");
    }
// AOP 代理驱动事务
    @Test
    public void testSpringAopXml() {
        String xmlPath = "applicationContext5.xml";
        ApplicationContext applicationContext = new ClassPathXmlApplicationContext(xmlPath);
        AccountService accountService = (AccountService) applicationContext.getBean("accountService");
        accountService.transfer("Tom", "Jack", 100);
        System.out.println("转账成功!");
    }

// 注解驱动事务
@Test
    public void testSpringAnnotation() {
        String xmlPath = "applicationContext6.xml";
        ApplicationContext applicationContext = new ClassPathXmlApplicationContext(xmlPath);
        AccountService accountService = (AccountService) applicationContext.getBean("accountService");
        accountService.transfer("Tom", "Jack", 100);
        System.out.println("转账成功!");
    }
}


评论区